本指南展示了如何使用Arduino IDE將0.96英寸SSD1306 OLED顯示器與ESP8266一起使用。我們將向您展示如何編寫文本,設置不同的字體,繪製形狀以及顯示點陣圖圖像。

我們還有專門的指南,介紹如何使用DHT傳感器和ESP8266顯示溫度和濕度讀數。

OLED顯示器不需要背光,因此在黑暗環境中可以產生很好的對比度。此外,其像素僅在打開時才消耗能量,因此與其他顯示器相比,OLED顯示器消耗的功率更少。
我們使用的模型有四個引腳,並使用I2C通信協議與任何微控制器進行通信。有些型號帶有額外的RESET引腳,或者使用SPI通信協議進行通信。
| Pin | ESP8266 |
| Vin | 3.3V |
| GND | GND |
| SCL | GPIO 5 (D1) |
| SDA | GPIO 4 (D2) |
或者,您可以按照下面原理圖將ESP8266連接到OLED顯示器。

在此範例中,我們使用I2C通信協議。ESP8266中最適的I2C通信管腳是GPIO 5 (SCL)和 GPIO 4 (SDA)。
如果您使用的是帶有SPI通信協議的OLED顯示器,請使用以下GPIO。
- GPIO 14:CLK
- GPIO 12:MISO
- GPIO 13:MOSI
- GPIO 15:CS
請按照以下步驟安裝這些庫。
1.打開您的Arduino IDE,然後轉到 草稿碼 > 匯入程式庫 > 管理程式庫。程式庫管理員應會開啟。
2.在搜索框中鍵入“ SSD1306 ”,然後從Adafruit安裝SSD1306庫。

3.從Adafruit安裝SSD1306庫後,在搜索框中鍵入“ GFX ”並安裝該庫。

4.安裝庫之後,重新啟動Arduino IDE。
我們將使用Arduino IDE來對ESP8266進行編程,因此您必須在Arduino IDE中安裝ESP8266插件。如果還沒有,請先閱讀下面教程:
 應加載以下程式碼:
/*********
  完整說明請參閱 https://honeststore.com.tw
*********/

#include <SPI.h>
#include <Wire.h>
#include <Adafruit_GFX.h>
#include <Adafruit_SSD1306.h>

#define SCREEN_WIDTH 128 // OLED display width, in pixels
#define SCREEN_HEIGHT 64 // OLED display height, in pixels

// SSD1306顯示器的聲明連接到I2C(SDA, SCL pins)
#define OLED_RESET     -1 // Reset pin # (or -1 if sharing Arduino reset pin)
Adafruit_SSD1306 display(SCREEN_WIDTH, SCREEN_HEIGHT, &Wire, OLED_RESET);

#define NUMFLAKES     10 // 動畫例中的雪花數量

#define LOGO_HEIGHT   16
#define LOGO_WIDTH    16
static const unsigned char PROGMEM logo_bmp[] =
{ B00000000, B11000000,
  B00000001, B11000000,
  B00000001, B11000000,
  B00000011, B11100000,
  B11110011, B11100000,
  B11111110, B11111000,
  B01111110, B11111111,
  B00110011, B10011111,
  B00011111, B11111100,
  B00001101, B01110000,
  B00011011, B10100000,
  B00111111, B11100000,
  B00111111, B11110000,
  B01111100, B11110000,
  B01110000, B01110000,
  B00000000, B00110000 };

void setup() {
  Serial.begin(115200);

  // SSD1306_SWITCHCAPVCC = generate display voltage from 3.3V internally
  if(!display.begin(SSD1306_SWITCHCAPVCC, 0x3C)) {
    Serial.println(F("SSD1306 allocation failed"));
    for(;;); // Don't proceed, loop forever
  }

  // 在螢幕上顯示初始顯示緩衝區內容
  display.display();
  delay(2000); // Pause for 2 seconds

  // 清除緩衝區
  display.clearDisplay();

  // Draw a single pixel in white
  display.drawPixel(10, 10, WHITE);

  // Show the display buffer on the screen. You MUST call display() after
  // drawing commands to make them visible on screen!
  display.display();
  delay(2000);
  // display.display() is NOT necessary after every single drawing command,
  // unless that's what you want...rather, you can batch up a bunch of
  // drawing operations and then update the screen all at once by calling
  // display.display(). These examples demonstrate both approaches...

  testdrawline();      // 畫出多個直線

  testdrawrect();      // 繪製矩形 (outlines)

  testfillrect();      // 繪製矩形 (filled)

  testdrawcircle();    // 繪製圓圈 (outlines)

  testfillcircle();    // 繪製圓圈 (filled)

  testdrawroundrect(); // 繪製圓角矩形 (outlines)

  testfillroundrect(); // 繪製圓角矩形 (filled)

  testdrawtriangle();  // 繪製三角形 (outlines)

  testfilltriangle();  // 繪製三角形 (filled)

  testdrawchar();      // 繪製預設字體的字符

  testdrawstyles();    // 繪製“程式化”字符

  testscrolltext();    // 繪製滾動文字

  testdrawbitmap();    // 繪製一個小點陣圖圖像

  // Invert and restore display, pausing in-between
  display.invertDisplay(true);
  delay(1000);
  display.invertDisplay(false);
  delay(1000);

  testanimate(logo_bmp, LOGO_WIDTH, LOGO_HEIGHT); // Animate bitmaps
}

void loop() {
}

void testdrawline() {
  int16_t i;

  display.clearDisplay(); // Clear display buffer

  for(i=0; i<display.width(); i+=4) {
    display.drawLine(0, 0, i, display.height()-1, WHITE);
    display.display(); // Update screen with each newly-drawn line
    delay(1);
  }
  for(i=0; i<display.height(); i+=4) {
    display.drawLine(0, 0, display.width()-1, i, WHITE);
    display.display();
    delay(1);
  }
  delay(250);

  display.clearDisplay();

  for(i=0; i<display.width(); i+=4) { display.drawLine(0, display.height()-1, i, 0, WHITE); display.display(); delay(1); } for(i=display.height()-1; i>=0; i-=4) {
    display.drawLine(0, display.height()-1, display.width()-1, i, WHITE);
    display.display();
    delay(1);
  }
  delay(250);

  display.clearDisplay();

  for(i=display.width()-1; i>=0; i-=4) {
    display.drawLine(display.width()-1, display.height()-1, i, 0, WHITE);
    display.display();
    delay(1);
  }
  for(i=display.height()-1; i>=0; i-=4) {
    display.drawLine(display.width()-1, display.height()-1, 0, i, WHITE);
    display.display();
    delay(1);
  }
  delay(250);

  display.clearDisplay();

  for(i=0; i<display.height(); i+=4) {
    display.drawLine(display.width()-1, 0, 0, i, WHITE);
    display.display();
    delay(1);
  }
  for(i=0; i<display.width(); i+=4) {
    display.drawLine(display.width()-1, 0, i, display.height()-1, WHITE);
    display.display();
    delay(1);
  }

  delay(2000); // Pause for 2 seconds
}

void testdrawrect(void) {
  display.clearDisplay();

  for(int16_t i=0; i<display.height()/2; i+=2) {
    display.drawRect(i, i, display.width()-2*i, display.height()-2*i, WHITE);
    display.display(); // Update screen with each newly-drawn rectangle
    delay(1);
  }

  delay(2000);
}

void testfillrect(void) {
  display.clearDisplay();

  for(int16_t i=0; i<display.height()/2; i+=3) {
    // The INVERSE color is used so rectangles alternate white/black
    display.fillRect(i, i, display.width()-i*2, display.height()-i*2, INVERSE);
    display.display(); // Update screen with each newly-drawn rectangle
    delay(1);
  }

  delay(2000);
}

void testdrawcircle(void) {
  display.clearDisplay();

  for(int16_t i=0; i<max(display.width(),display.height())/2; i+=2) { display.drawCircle(display.width()/2, display.height()/2, i, WHITE); display.display(); delay(1); } delay(2000); } void testfillcircle(void) { display.clearDisplay(); for(int16_t i=max(display.width(),display.height())/2; i>0; i-=3) {
    // The INVERSE color is used so circles alternate white/black
    display.fillCircle(display.width() / 2, display.height() / 2, i, INVERSE);
    display.display(); // Update screen with each newly-drawn circle
    delay(1);
  }

  delay(2000);
}

void testdrawroundrect(void) {
  display.clearDisplay();

  for(int16_t i=0; i<display.height()/2-2; i+=2) {
    display.drawRoundRect(i, i, display.width()-2*i, display.height()-2*i,
      display.height()/4, WHITE);
    display.display();
    delay(1);
  }

  delay(2000);
}

void testfillroundrect(void) {
  display.clearDisplay();

  for(int16_t i=0; i<display.height()/2-2; i+=2) {
    // The INVERSE color is used so round-rects alternate white/black
    display.fillRoundRect(i, i, display.width()-2*i, display.height()-2*i,
      display.height()/4, INVERSE);
    display.display();
    delay(1);
  }

  delay(2000);
}

void testdrawtriangle(void) {
  display.clearDisplay();

  for(int16_t i=0; i<max(display.width(),display.height())/2; i+=5) { display.drawTriangle( display.width()/2 , display.height()/2-i, display.width()/2-i, display.height()/2+i, display.width()/2+i, display.height()/2+i, WHITE); display.display(); delay(1); } delay(2000); } void testfilltriangle(void) { display.clearDisplay(); for(int16_t i=max(display.width(),display.height())/2; i>0; i-=5) {
    // The INVERSE color is used so triangles alternate white/black
    display.fillTriangle(
      display.width()/2  , display.height()/2-i,
      display.width()/2-i, display.height()/2+i,
      display.width()/2+i, display.height()/2+i, INVERSE);
    display.display();
    delay(1);
  }

  delay(2000);
}

void testdrawchar(void) {
  display.clearDisplay();

  display.setTextSize(1);      // Normal 1:1 pixel scale
  display.setTextColor(WHITE); // Draw white text
  display.setCursor(0, 0);     // Start at top-left corner
  display.cp437(true);         // Use full 256 char 'Code Page 437' font

  // Not all the characters will fit on the display. This is normal.
  // Library will draw what it can and the rest will be clipped.
  for(int16_t i=0; i<256; i++) {
    if(i == '\n') display.write(' ');
    else          display.write(i);
  }

  display.display();
  delay(2000);
}

void testdrawstyles(void) {
  display.clearDisplay();

  display.setTextSize(1);             // Normal 1:1 pixel scale
  display.setTextColor(WHITE);        // Draw white text
  display.setCursor(0,0);             // Start at top-left corner
  display.println(F("Hello, world!"));

  display.setTextColor(BLACK, WHITE); // Draw 'inverse' text
  display.println(3.141592);

  display.setTextSize(2);             // Draw 2X-scale text
  display.setTextColor(WHITE);
  display.print(F("0x")); display.println(0xDEADBEEF, HEX);

  display.display();
  delay(2000);
}

void testscrolltext(void) {
  display.clearDisplay();

  display.setTextSize(2); // Draw 2X-scale text
  display.setTextColor(WHITE);
  display.setCursor(10, 0);
  display.println(F("scroll"));
  display.display();      // Show initial text
  delay(100);

  // Scroll in various directions, pausing in-between:
  display.startscrollright(0x00, 0x0F);
  delay(2000);
  display.stopscroll();
  delay(1000);
  display.startscrollleft(0x00, 0x0F);
  delay(2000);
  display.stopscroll();
  delay(1000);
  display.startscrolldiagright(0x00, 0x07);
  delay(2000);
  display.startscrolldiagleft(0x00, 0x07);
  delay(2000);
  display.stopscroll();
  delay(1000);
}

void testdrawbitmap(void) {
  display.clearDisplay();

  display.drawBitmap(
    (display.width()  - LOGO_WIDTH ) / 2,
    (display.height() - LOGO_HEIGHT) / 2,
    logo_bmp, LOGO_WIDTH, LOGO_HEIGHT, 1);
  display.display();
  delay(1000);
}

#define XPOS   0 // Indexes into the 'icons' array in function below
#define YPOS   1
#define DELTAY 2

void testanimate(const uint8_t *bitmap, uint8_t w, uint8_t h) {
  int8_t f, icons[NUMFLAKES][3];

  // Initialize 'snowflake' positions
  for(f=0; f< NUMFLAKES; f++) {
    icons[f][XPOS]   = random(1 - LOGO_WIDTH, display.width());
    icons[f][YPOS]   = -LOGO_HEIGHT;
    icons[f][DELTAY] = random(1, 6);
    Serial.print(F("x: "));
    Serial.print(icons[f][XPOS], DEC);
    Serial.print(F(" y: "));
    Serial.print(icons[f][YPOS], DEC);
    Serial.print(F(" dy: "));
    Serial.println(icons[f][DELTAY], DEC);
  }

  for(;;) { // Loop forever...
    display.clearDisplay(); // Clear the display buffer

    // Draw each snowflake:
    for(f=0; f< NUMFLAKES; f++) {
      display.drawBitmap(icons[f][XPOS], icons[f][YPOS], bitmap, w, h, WHITE);
    }

    display.display(); // Show the display buffer on the screen
    delay(200);        // Pause for 1/10 second

    // Then update coordinates of each flake...
    for(f=0; f< NUMFLAKES; f++) { icons[f][YPOS] += icons[f][DELTAY]; // If snowflake is off the bottom of the screen... if (icons[f][YPOS] >= display.height()) {
        // Reinitialize to a random position, just off the top
        icons[f][XPOS]   = random(1 - LOGO_WIDTH, display.width());
        icons[f][YPOS]   = -LOGO_HEIGHT;
        icons[f][DELTAY] = random(1, 6);
      }
    }
  }
}
如果您的OLED沒有RESET引腳,則應將OLED_RESET變數設置為-1,如下所示:
#define OLED_RESET -1 // Reset pin # (or -1 if sharing Arduino reset pin)

注意:如果OLED具有RESET引腳,則應將其連接到與GPIO 4不同的GPIO,因為該引腳正在EPS8266中用於I2C通信。 將程式碼上傳到ESP8266開發板。不要忘記在“工具”選單中選擇正確的開發版和COM端口。 如下面的短視頻所示,您應該在OLED中獲得一系列不同的動畫。
如果您的OLED顯示器什麼都不顯示:
- 檢查OLED顯示器是否已正確連接到ESP8266
- 仔細檢查OLED顯示器的I2C地址:在OLED連接到ESP8266的情況下,上傳此程式碼並在Serial Monitor中檢查I2C地址
如有必要,應在下一行中更改OLED地址。這裡的情況下,地址為0x3C。
if(!display.begin(SSD1306_SWITCHCAPVCC, 0x3C)) {
“Hello world!” OLED顯示器
以下草稿碼顯示 Hello world! OLED顯示器中顯示消息。
/*********
  Terry Lee
  完整說明請參閱 https://honeststore.com.tw
*********/

#include <Wire.h>
#include <Adafruit_GFX.h>
#include <Adafruit_SSD1306.h>

#define SCREEN_WIDTH 128 // OLED display width, in pixels
#define SCREEN_HEIGHT 64 // OLED display height, in pixels

// Declaration for an SSD1306 display connected to I2C (SDA, SCL pins)
Adafruit_SSD1306 display(SCREEN_WIDTH, SCREEN_HEIGHT, &Wire, -1);

void setup() {
  Serial.begin(115200);

  if(!display.begin(SSD1306_SWITCHCAPVCC, 0x3C)) { // Address 0x3D for 128x64
    Serial.println(F("SSD1306 allocation failed"));
    for(;;);
  }
  delay(2000);
  display.clearDisplay();

  display.setTextSize(1);
  display.setTextColor(WHITE);
  display.setCursor(0, 10);
  // Display static text
  display.println("Hello, world!");
  display.display();
}

void loop() {

}
上載程式碼後,這將在OLED中顯示:

讓我們快速看一下程式碼的工作方式。
導入庫
首先,您需要導入必要的庫。使用I2C的Wire庫和Adafruit庫寫入顯示: Adafruit_GFX 和 Adafruit_SSD1306。
#include <Wire.h>
#include <Adafruit_GFX.h>
#include <Adafruit_SSD1306.h>
初始化OLED顯示器
然後,定義OLED的寬度和高度。在此範例中,我們使用128×64 OLED顯示器。如果您使用其他尺寸,則可以在SCREEN_WIDTH和 SCREEN_HEIGHT 變數設定。
#define SCREEN_WIDTH 128 // OLED display width, in pixels
#define SCREEN_HEIGHT 64 // OLED display height, in pixels然後,使用I2C通信協議(前面定義的寬度和高度)初始化顯示物件(&Wire)。
Adafruit_SSD1306 display(SCREEN_WIDTH, SCREEN_HEIGHT, &Wire, -1);(-1)參數表示您的OLED顯示器沒有RESET引腳。如果您的OLED顯示器確實具有RESET引腳,則應將其連接到GPIO。在這種情況下,您應該傳遞GPIO號作為參數。
在setup()裡,以115200的鮑率初始化序列監視器,以進行調試。
Serial.begin(115200);使用初始化OLED顯示器 begin() 方法如下:
if(!display.begin(SSD1306_SWITCHCAPVCC, 0x3C)) {
  Serial.println("SSD1306 allocation failed");
  for(;;); // Don't proceed, loop forever
}
如果我們無法連接到顯示器,此程式碼段還會在序列監視器上印出一條消息。
Serial.println("SSD1306 allocation failed");如果您使用其他OLED顯示器,則可能需要更改OLED地址。在我們的例子中,地址是0x3C。
if(!display.begin(SSD1306_SWITCHCAPVCC, 0x3C)) { 如果該地址不起作用,則可以運作I2C掃描儀草稿碼以找到您的OLED地址。您可以在此處找到I2C掃描儀草稿碼。
初始化顯示後,加入兩秒鐘的延遲,以便OLED有足夠的時間在寫入text之前進行初始化:
delay(2000);清除顯示內容,設置字體大小,顏色並編寫text
初始化顯示後,用 clearDisplay() 方法:
display.clearDisplay();在編寫text之前,您需要設置text大小,顏色以及在OLED中顯示text的位置。
使用設置字體大小 setTextSize() 方法:
display.setTextSize(1); 用設置字體顏色 setTextColor() 方法:
display.setTextColor(WHITE); WHITE 設置白色字體和黑色背景。
使用定義text開始的位置 setCursor(x,y)方法。在這種情況下,我們將text設置為以(0,10)坐標開始。
display.setCursor(0,10); 最後,您可以使用 println() 方法如下:
display.println("Hello, world!");然後,您需要呼叫 display() 在螢幕上實際顯示text的方法。
display.display();滾動文字
Adafruit OLED庫提供了有用的方法來輕鬆滾動text文字。
- startscrollright(0x00,0x0F):從左向右滾動文字
- startscrollleft(0x00,0x0F):從右向左滾動文字
- startscrolldiagright(0x00,0x07):將文字從左下角滾動到右上角
- startscrolldiagleft(0x00,0x07):將文字從右下角滾動到左上角
下面的草稿碼實現了這些方法。
/*********
  Terry Lee
  完整說明請參閱 https://honeststore.com.tw
*********/

#include <Wire.h>
#include <Adafruit_GFX.h>
#include <Adafruit_SSD1306.h>

#define SCREEN_WIDTH 128 // OLED display width, in pixels
#define SCREEN_HEIGHT 64 // OLED display height, in pixels

// Declaration for an SSD1306 display connected to I2C (SDA, SCL pins)
Adafruit_SSD1306 display(SCREEN_WIDTH, SCREEN_HEIGHT, &Wire, -1);

void setup() {
  Serial.begin(115200);

  if(!display.begin(SSD1306_SWITCHCAPVCC, 0x3C)) { // Address 0x3D for 128x64
    Serial.println(F("SSD1306 allocation failed"));
    for(;;);
  }
  delay(2000);
  display.clearDisplay();

  display.setTextSize(1);
  display.setTextColor(WHITE);
  display.setCursor(0, 0);
  // Display static text
  display.println("Scrolling Text");
  display.display();
  delay(100);

}

void loop() {
  // Scroll in various directions, pausing in-between:
  display.startscrollright(0x00, 0x0F);
  delay(2000);
  display.stopscroll();
  delay(1000);
  display.startscrollleft(0x00, 0x0F);
  delay(2000);
  display.stopscroll();
  delay(1000);
  display.startscrolldiagright(0x00, 0x07);
  delay(2000);
  display.startscrolldiagleft(0x00, 0x07);
  delay(2000);
  display.stopscroll();
  delay(1000);
}
文字滾動,如下面的短視頻所示。
大小由實際字體設置。所以setTextSize()方法不適用於這些字體。字體有9、12、18和24點的大小,並且還包含7位元字符(ASCII碼)(在字體名稱中描述為7b)。
您可以從下一個字體選擇中進行選擇:
FreeMono12pt7b.h		FreeSansBoldOblique12pt7b.h
FreeMono18pt7b.h		FreeSansBoldOblique18pt7b.h
FreeMono24pt7b.h		FreeSansBoldOblique24pt7b.h
FreeMono9pt7b.h			FreeSansBoldOblique9pt7b.h
FreeMonoBold12pt7b.h		FreeSansOblique12pt7b.h
FreeMonoBold18pt7b.h		FreeSansOblique18pt7b.h
FreeMonoBold24pt7b.h		FreeSansOblique24pt7b.h
FreeMonoBold9pt7b.h		FreeSansOblique9pt7b.h
FreeMonoBoldOblique12pt7b.h	FreeSerif12pt7b.h
FreeMonoBoldOblique18pt7b.h	FreeSerif18pt7b.h
FreeMonoBoldOblique24pt7b.h	FreeSerif24pt7b.h
FreeMonoBoldOblique9pt7b.h	FreeSerif9pt7b.h
FreeMonoOblique12pt7b.h		FreeSerifBold12pt7b.h
FreeMonoOblique18pt7b.h		FreeSerifBold18pt7b.h
FreeMonoOblique24pt7b.h		FreeSerifBold24pt7b.h
FreeMonoOblique9pt7b.h		FreeSerifBold9pt7b.h
FreeSans12pt7b.h		FreeSerifBoldItalic12pt7b.h
FreeSans18pt7b.h		FreeSerifBoldItalic18pt7b.h
FreeSans24pt7b.h		FreeSerifBoldItalic24pt7b.h
FreeSans9pt7b.h			FreeSerifBoldItalic9pt7b.h
FreeSansBold12pt7b.h		FreeSerifItalic12pt7b.h
FreeSansBold18pt7b.h		FreeSerifItalic18pt7b.h
FreeSansBold24pt7b.h		FreeSerifItalic24pt7b.h
FreeSansBold9pt7b.h		FreeSerifItalic9pt7b.h
與OLED顯示器配合使用的字體更好,字體為9點和12點。
要使用其中一種字體,首先需要將其include在草稿碼中,例如:
#include <Fonts/FreeSerif12pt7b.h>接下來,您只需要使用 setFont() 方法並作為參數傳遞指定的字體:
display.setFont(&FreeSerif12pt7b);指定字體後,所有寫入文字的方法都將使用該字體。要恢復使用原始字體,您只需調用setFont() 沒有參數的方法:
display.setFont();將下一個草稿碼上傳到開發板上:
/*********
  Terry Lee
  完整說明請參閱https://honeststore.com.tw
*********/

#include <Wire.h>
#include <Adafruit_GFX.h>
#include <Adafruit_SSD1306.h>
#include <Fonts/FreeSerif9pt7b.h>

#define SCREEN_WIDTH 128 // OLED display width, in pixels
#define SCREEN_HEIGHT 64 // OLED display height, in pixels

// Declaration for an SSD1306 display connected to I2C (SDA, SCL pins)
Adafruit_SSD1306 display(SCREEN_WIDTH, SCREEN_HEIGHT, &Wire, -1);

void setup() {
  Serial.begin(115200);

  if(!display.begin(SSD1306_SWITCHCAPVCC, 0x3C)) {
    Serial.println("SSD1306 allocation failed");
    for(;;);
  }
  delay(2000);

  display.setFont(&FreeSerif9pt7b);
  display.clearDisplay();
  display.setTextSize(1);
  display.setTextColor(WHITE);
  display.setCursor(0,30);
  display.println("Hello, world!");
  display.display();
  delay(2000);
}
void loop() {

}
現在,您的顯示器將顯示FreeSerif字體的“ Hello,world!” 消息。

畫一個像素

要在OLED顯示器中繪製像素,可以使用 drawPixel(x,y,color)接受x和y坐標作為像素出現位置以及顏色的方法。例如:
display.drawPixel(10, 10, WHITE);畫一條線

使用 drawLine(x1,y1,x2,y2,顏色)建置線的方法。(x1,y1)座標指示線的開始座標,而(x2,y2)座標指示線的結束座標。例如:
display.drawLine(0, 20, 127, 40, WHITE);畫一個矩形

drawRect(x,y,width,height,color)提供了一種繪製矩形的簡易方法。(x,y)坐標指示矩形的左上角。然後,您需要指定寬度,高度和顏色:
display.drawRect(20, 20, 60, 30, WHITE);您可以使用 fillRect(x,y,寬度,高度,顏色)繪製一個實心的矩形。此方法接受與以下方法相同的參數drawRect()。

該庫還提供了顯示帶有圓角矩形的方法: drawRoundRect() 和 fillRoundRect()。這些方法與先前使用方法相同的參數,外加拐角的半徑。例如:
display.drawRoundRect(20, 20, 60, 30, 2, WHITE);
或填充的圓角矩形:
display.fillRoundRect(10, 10, 30, 50, 2, WHITE);
畫一個圓

畫一個圓使用 drawCircle(x,y,半徑,顏色)方法。(x,y)坐標表示圓的中心,您還需指定圓的半徑。例如:
display.drawCircle(64, 32, 10, WHITE);同樣,要建立實心圓,請使用 fillCircle() 具有相同參數的方法:
display.fillCircle(64, 32, 10, WHITE);
畫一個三角形

使用 drawTriangle(x1,y1,x2,y2,x3,y3,顏色)建立三角形的方法。此方法接受每個角和顏色的坐標作為參數。
display.drawTriangle(20, 20, 55, 20, 25, 40, WHITE);使用 fillTriangle() 繪製實心三角形的方法。
display.fillTriangle(20, 20, 55, 20, 25, 40, WHITE);
反轉倒置
該庫提供了可用於形狀或文字的另一種方法: invertDisplay()方法。通過 true 作為參數來反轉屏幕的顏色或 false 恢復原始顏色。
如果在定義三角形後調用以下命令:
display.invertDisplay(true);您將得到一個倒三角形,如下所示:

程式碼–繪製形狀
上傳以下草稿碼,該草稿碼實現了我們之前介紹的所有代碼片段,並遍歷了所有形狀。
/*********
  Terry Lee
  完整說明請參閱 https://honeststore.com.tw
*********/

#include <Wire.h>
#include <Adafruit_GFX.h>
#include <Adafruit_SSD1306.h>

#define SCREEN_WIDTH 128
#define SCREEN_HEIGHT 64

// Declaration for an SSD1306 display connected to I2C (SDA, SCL pins)
Adafruit_SSD1306 display(SCREEN_WIDTH, SCREEN_HEIGHT, &Wire, -1);

void setup() {
  Serial.begin(115200);

  if(!display.begin(SSD1306_SWITCHCAPVCC, 0x3C)) {
    Serial.println(F("SSD1306 allocation failed"));
    for(;;);
  }
  delay(2000); // Pause for 2 seconds

  // Clear the buffer
  display.clearDisplay();

  // 用白色繪製一個單點像素
  display.drawPixel(64, 32, WHITE);
  display.display();
  delay(3000);

  // 繪製線
  display.clearDisplay();
  display.drawLine(0, 0, 127, 20, WHITE);
  display.display();
  delay(3000);

  // 繪製正方形
  display.clearDisplay();
  display.drawRect(30, 10, 50, 30, WHITE);
  display.display();
  delay(3000);
  // 繪製實心正方形
  display.fillRect(30, 10, 50, 30, WHITE);
  display.display();
  delay(3000);

  // 繪製圓角正方形
  display.clearDisplay();
  display.drawRoundRect(10, 10, 30, 50, 2, WHITE);
  display.display();
  delay(3000);
  // 繪製實心圓角正方形
  display.clearDisplay();
  display.fillRoundRect(10, 10, 30, 50, 2, WHITE);
  display.display();
  delay(3000);

  // 繪製圓
  display.clearDisplay();
  display.drawCircle(64, 32, 10, WHITE);
  display.display();
  delay(3000);
  // 繪製實心圓
  display.fillCircle(64, 32, 10, WHITE);
  display.display();
  delay(3000);

  // 繪製三角形
  display.clearDisplay();
  display.drawTriangle(10, 10, 55, 20, 5, 40, WHITE);
  display.display();
  delay(3000);
  // 繪製實心三角形
  display.fillTriangle(10, 10, 55, 20, 5, 40, WHITE);
  display.display();
  delay(3000);

  // 反轉倒置實心三角形再復烣正常
  display.invertDisplay(true);
  delay(3000);
  display.invertDisplay(false);
  delay(3000);
}

void loop() {

}
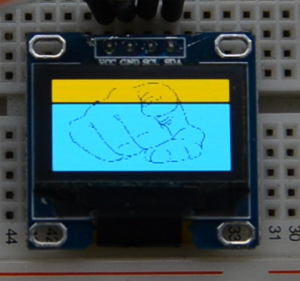
您可以在OLED顯示器上顯示128×64點陣圖單色圖像。
首先,使用成像程序調整照片或圖片的大小並將其另存為單色點陣圖。如果您使用的是Windows作業系統,則可以使用小畫家工具編輯。

然後,使用Image轉C陣列轉換器將圖像轉換為陣列。這裡使用LCD Image Converter。
執行程序並新增一個Image開始。轉到Image>Import,然後選擇您之前建立的點陣圖圖像。

轉到Options>Conversion,然後在Prepare標籤中,選擇以下選項:
- Type: Monochrome, Threshold Dither
- Main Scan Direction: Top to Bottom
- Line Scan Direction: Forward

轉到Image tab,然後選擇以下選項:
- Split to rows
- Block size: 8 bit
- Byte order: Little-Endian

然後,單擊確定。最後,在主菜單中,轉到“檔案” >“轉換”。應該保存一個擴展名為.c的新文件。該文件包含圖像的C陣列檔案。使用文字編輯器打開該文件,然後復制陣列。
在本例子中,這是我們得到的數組:
static const uint8_t image_data_Image[1024] = {
    0xff, 0xff, 0xff, 0xff, 0xff, 0xff, 0xff, 0xff, 0xff, 0xff, 0xff, 0xff, 0xff, 0xff, 0xff, 0xff,
    0xff, 0xff, 0xff, 0xff, 0xff, 0xff, 0xff, 0xff, 0xff, 0xff, 0xff, 0xff, 0xff, 0xff, 0xff, 0xff,
    0xff, 0xff, 0xff, 0xff, 0xff, 0xff, 0xff, 0xff, 0xf8, 0x07, 0xff, 0xff, 0xff, 0xff, 0xff, 0xff,
    0xff, 0xff, 0xff, 0xff, 0xff, 0xff, 0xff, 0xff, 0x9f, 0xff, 0x7f, 0xff, 0xff, 0xff, 0xff, 0xff,
    0xff, 0xff, 0xff, 0xff, 0xff, 0xff, 0xff, 0xfc, 0xff, 0xff, 0xcf, 0xff, 0xff, 0xff, 0xff, 0xff,
    0xff, 0xff, 0xff, 0xff, 0xff, 0xff, 0xff, 0xe7, 0xff, 0xff, 0xf7, 0xff, 0xff, 0xff, 0xff, 0xff,
    0xff, 0xff, 0xff, 0xff, 0xff, 0xf3, 0xff, 0xff, 0xff, 0xff, 0xfb, 0xff, 0xff, 0xff, 0xff, 0xff,
    0xff, 0xff, 0xff, 0xff, 0xff, 0xef, 0xff, 0xff, 0xff, 0xff, 0xfe, 0xff, 0xff, 0xff, 0xff, 0xff,
    0xff, 0xff, 0xff, 0xff, 0xff, 0xdf, 0xff, 0xfd, 0xff, 0xff, 0xff, 0xff, 0xff, 0xff, 0xff, 0xff,
    0xff, 0xff, 0xff, 0xff, 0xff, 0xbf, 0xff, 0xff, 0xf3, 0xff, 0xff, 0x7f, 0xff, 0xff, 0xff, 0xff,
    0xff, 0xff, 0xff, 0xff, 0xff, 0xbf, 0xff, 0xff, 0xef, 0xff, 0xff, 0xbf, 0xff, 0xff, 0xff, 0xff,
    0xff, 0xff, 0xff, 0xff, 0xff, 0x7f, 0xff, 0xfd, 0xdf, 0xff, 0xff, 0xbf, 0xff, 0xff, 0xff, 0xff,
    0xff, 0xff, 0xff, 0xff, 0xff, 0x7f, 0xff, 0xfd, 0xbe, 0x7d, 0xff, 0xdf, 0xff, 0xff, 0xff, 0xff,
    0xff, 0xff, 0xff, 0xff, 0xfe, 0xff, 0xff, 0xfe, 0x7b, 0xfd, 0xff, 0xdf, 0xff, 0xff, 0xff, 0xff,
    0xff, 0xff, 0xff, 0xff, 0xfb, 0xff, 0xff, 0xfe, 0x6f, 0xe7, 0xff, 0xcf, 0xff, 0xff, 0xff, 0xff,
    0xff, 0xff, 0xff, 0xfe, 0x3f, 0xff, 0xff, 0xff, 0x5e, 0xff, 0xff, 0xd7, 0xff, 0xff, 0xff, 0xff,
    0xff, 0xff, 0xff, 0xf9, 0xff, 0xff, 0xff, 0xff, 0x7b, 0xff, 0xff, 0xd7, 0xff, 0xff, 0xff, 0xff,
    0xff, 0xff, 0xff, 0xef, 0xff, 0xff, 0xff, 0xff, 0x2f, 0xff, 0xff, 0xbb, 0xff, 0xff, 0xff, 0xff,
    0xff, 0xff, 0xff, 0xdf, 0xff, 0xff, 0xff, 0xff, 0x7f, 0xff, 0xff, 0xbb, 0xff, 0xff, 0xff, 0xff,
    0xff, 0xff, 0xff, 0xbf, 0xff, 0xff, 0xff, 0xff, 0x7f, 0xff, 0xff, 0x7d, 0xff, 0xff, 0xff, 0xff,
    0xff, 0xff, 0xff, 0x7f, 0xff, 0xff, 0xff, 0xff, 0x7f, 0xff, 0xfc, 0xfd, 0xff, 0xff, 0xff, 0xff,
    0xff, 0xff, 0xff, 0x7f, 0xff, 0xff, 0xff, 0xff, 0x7f, 0xff, 0xfb, 0xff, 0xff, 0xff, 0xff, 0xff,
    0xff, 0xff, 0xfe, 0xff, 0xff, 0xff, 0xff, 0xff, 0xbf, 0xff, 0xef, 0xfe, 0xff, 0xff, 0xff, 0xff,
    0xff, 0xff, 0xfe, 0xff, 0xff, 0xfd, 0xff, 0xff, 0xdf, 0xff, 0x3f, 0xfe, 0xff, 0xff, 0xff, 0xff,
    0xff, 0xff, 0xfd, 0xff, 0xff, 0xf6, 0xff, 0xff, 0xf1, 0xe1, 0xff, 0xff, 0xff, 0xff, 0xff, 0xff,
    0xff, 0xff, 0xf7, 0xff, 0xff, 0xfb, 0xff, 0xff, 0xff, 0xb7, 0xed, 0xff, 0x7f, 0xff, 0xff, 0xff,
    0xff, 0xff, 0x9f, 0xff, 0xff, 0xfd, 0x7f, 0xff, 0xff, 0xdf, 0xdf, 0xff, 0x7f, 0xff, 0xff, 0xff,
    0xff, 0xfe, 0x7f, 0xff, 0xff, 0xfe, 0xff, 0xff, 0xff, 0xef, 0x33, 0xff, 0x7f, 0xff, 0xff, 0xff,
    0xff, 0xfb, 0xff, 0xff, 0xff, 0xff, 0xbf, 0xff, 0xff, 0xf4, 0xef, 0xff, 0xbf, 0xff, 0xff, 0xff,
    0xff, 0xf7, 0xff, 0xef, 0xff, 0xff, 0xdf, 0xff, 0xff, 0xf3, 0x9b, 0xff, 0xbf, 0xff, 0xff, 0xff,
    0xff, 0xf7, 0xff, 0xf7, 0xff, 0xff, 0xff, 0xff, 0xff, 0xf8, 0x67, 0xff, 0xdf, 0xff, 0xff, 0xff,
    0xff, 0xff, 0xff, 0xdb, 0xff, 0xff, 0xef, 0xff, 0xff, 0xfd, 0x3f, 0xff, 0xf7, 0xff, 0xff, 0xff,
    0xff, 0xff, 0xff, 0xf3, 0xff, 0xff, 0xf7, 0xff, 0xff, 0xfd, 0xdf, 0xff, 0xf9, 0xff, 0xff, 0xff,
    0xff, 0xff, 0xff, 0xfd, 0xff, 0xff, 0xf7, 0xff, 0xff, 0xfe, 0xef, 0xfc, 0xff, 0x3f, 0xff, 0xff,
    0xff, 0xff, 0xff, 0xfe, 0xff, 0xff, 0xfb, 0xff, 0xff, 0xff, 0xef, 0xf3, 0xff, 0xdf, 0xff, 0xff,
    0xff, 0xff, 0xff, 0xff, 0xff, 0xff, 0xfd, 0xff, 0xff, 0xff, 0xf7, 0xef, 0xff, 0xff, 0xff, 0xff,
    0xff, 0xf7, 0xff, 0xff, 0x7f, 0xff, 0xfd, 0xff, 0xe7, 0xff, 0xf7, 0xdf, 0xff, 0xf7, 0xff, 0xff,
    0xff, 0xf7, 0xff, 0xff, 0xbf, 0xff, 0xfe, 0xff, 0x3f, 0xff, 0xfb, 0xbf, 0xff, 0xfb, 0xff, 0xff,
    0xff, 0xf7, 0xff, 0xff, 0xdf, 0xff, 0xff, 0xfd, 0xff, 0xff, 0xfb, 0x7f, 0xff, 0xfb, 0xff, 0xff,
    0xff, 0xfb, 0xff, 0xff, 0xdf, 0xff, 0xff, 0x7b, 0xff, 0xff, 0xfe, 0xff, 0xff, 0xfb, 0xff, 0xff,
    0xff, 0xfb, 0xff, 0xff, 0xef, 0xff, 0xff, 0xbf, 0xff, 0xff, 0xfd, 0xff, 0xff, 0xfb, 0xff, 0xff,
    0xff, 0xfd, 0xff, 0xff, 0xf7, 0xff, 0xff, 0xdf, 0xff, 0xff, 0xf8, 0x79, 0xff, 0xf7, 0xff, 0xff,
    0xff, 0xfd, 0xff, 0xff, 0xff, 0xff, 0xff, 0xdf, 0xff, 0xff, 0xcf, 0xff, 0xff, 0xf7, 0xff, 0xff,
    0xff, 0xfe, 0x7f, 0xff, 0xfb, 0xff, 0xff, 0xef, 0xff, 0xff, 0x3f, 0xff, 0xff, 0xef, 0xff, 0xff,
    0xff, 0xff, 0xbf, 0xff, 0xfd, 0xff, 0xf9, 0xf7, 0xff, 0xfc, 0xff, 0xff, 0xfe, 0xef, 0xff, 0xff,
    0xff, 0xff, 0xdf, 0xff, 0xfe, 0xff, 0x9f, 0xfb, 0xff, 0xf3, 0xff, 0xff, 0xff, 0xaf, 0xff, 0xff,
    0xff, 0xff, 0xef, 0xff, 0xff, 0x7f, 0x7f, 0xfd, 0xff, 0xcf, 0xff, 0xff, 0xff, 0xcf, 0xff, 0xff,
    0xff, 0xff, 0xfb, 0xff, 0xff, 0xbe, 0xff, 0xfe, 0x7c, 0xff, 0xff, 0xfe, 0xff, 0xef, 0xff, 0xff,
    0xff, 0xff, 0xfd, 0xff, 0xff, 0xdf, 0xff, 0xff, 0x87, 0xff, 0xff, 0xff, 0x7f, 0xef, 0xff, 0xff,
    0xff, 0xff, 0xfe, 0x7f, 0xff, 0xef, 0xff, 0xff, 0x6f, 0xbf, 0xdf, 0xff, 0x7f, 0xff, 0xff, 0xff,
    0xff, 0xff, 0xff, 0xbf, 0xff, 0xf7, 0xff, 0xfe, 0xdf, 0x7f, 0xef, 0xff, 0xbf, 0xff, 0xff, 0xff,
    0xff, 0xff, 0xff, 0xdf, 0xff, 0xf9, 0xff, 0xfd, 0xde, 0xff, 0xf7, 0xff, 0xbf, 0xdf, 0xff, 0xff,
    0xff, 0xff, 0xff, 0xf7, 0xff, 0xfe, 0x1f, 0xc7, 0xfe, 0xff, 0xf7, 0xff, 0xff, 0xdf, 0xff, 0xff,
    0xff, 0xff, 0xff, 0xfd, 0xff, 0xff, 0xf8, 0x7f, 0xfd, 0xff, 0xff, 0xff, 0xdf, 0xbf, 0xff, 0xff,
    0xff, 0xff, 0xff, 0xfe, 0x7f, 0xff, 0xde, 0xff, 0xdd, 0xff, 0xff, 0xff, 0xdc, 0xff, 0xff, 0xff,
    0xff, 0xff, 0xff, 0xff, 0x9f, 0xff, 0x33, 0xff, 0xfd, 0xff, 0xf7, 0xff, 0xa7, 0xff, 0xff, 0xff,
    0xff, 0xff, 0xff, 0xff, 0xf3, 0xf8, 0x7f, 0xff, 0xed, 0xff, 0xff, 0xf9, 0xff, 0xff, 0xff, 0xff,
    0xff, 0xff, 0xff, 0xff, 0xff, 0x0f, 0xff, 0xff, 0xf8, 0xff, 0xc8, 0x3f, 0xff, 0xff, 0xff, 0xff,
    0xff, 0xff, 0xff, 0xff, 0xff, 0xff, 0xff, 0xff, 0xff, 0x00, 0xff, 0xff, 0xff, 0xff, 0xff, 0xff,
    0xff, 0xff, 0xff, 0xff, 0xff, 0xff, 0xff, 0xff, 0xff, 0xff, 0xff, 0xff, 0xff, 0xff, 0xff, 0xff,
    0xff, 0xff, 0xff, 0xff, 0xff, 0xff, 0xff, 0xff, 0xff, 0xff, 0xff, 0xff, 0xff, 0xff, 0xff, 0xff,
    0xff, 0xff, 0xff, 0xff, 0xff, 0xff, 0xff, 0xff, 0xff, 0xff, 0xff, 0xff, 0xff, 0xff, 0xff, 0xff,
    0xff, 0xff, 0xff, 0xff, 0xff, 0xff, 0xff, 0xff, 0xff, 0xff, 0xff, 0xff, 0xff, 0xff, 0xff, 0xff,
    0xff, 0xff, 0xff, 0xff, 0xff, 0xff, 0xff, 0xff, 0xff, 0xff, 0xff, 0xff, 0xff, 0xff, 0xff, 0xff
};
將陣列複製到草稿碼。然後,要顯示陣列,請使用drawBitmap()接受以下參數(x,y,圖像陣列,圖像寬度,圖像高度,旋轉)的方法。(x,y)坐標定義開始顯示圖像的位置。
複製下面的程式碼以在OLED中顯示點陣圖圖像。
/*********
  Terry Lee
  完整說明請參閱 https://honeststore.com.tw
*********/

#include <Wire.h>
#include <Adafruit_GFX.h>
#include <Adafruit_SSD1306.h>

#define SCREEN_WIDTH 128
#define SCREEN_HEIGHT 64

Adafruit_SSD1306 display(SCREEN_WIDTH, SCREEN_HEIGHT, &Wire, -1);

static const uint8_t image_data_Image[1024] = {
    0xff, 0xff, 0xff, 0xff, 0xff, 0xff, 0xff, 0xff, 0xff, 0xff, 0xff, 0xff, 0xff, 0xff, 0xff, 0xff,
    0xff, 0xff, 0xff, 0xff, 0xff, 0xff, 0xff, 0xff, 0xff, 0xff, 0xff, 0xff, 0xff, 0xff, 0xff, 0xff,
    0xff, 0xff, 0xff, 0xff, 0xff, 0xff, 0xff, 0xff, 0xf8, 0x07, 0xff, 0xff, 0xff, 0xff, 0xff, 0xff,
    0xff, 0xff, 0xff, 0xff, 0xff, 0xff, 0xff, 0xff, 0x9f, 0xff, 0x7f, 0xff, 0xff, 0xff, 0xff, 0xff,
    0xff, 0xff, 0xff, 0xff, 0xff, 0xff, 0xff, 0xfc, 0xff, 0xff, 0xcf, 0xff, 0xff, 0xff, 0xff, 0xff,
    0xff, 0xff, 0xff, 0xff, 0xff, 0xff, 0xff, 0xe7, 0xff, 0xff, 0xf7, 0xff, 0xff, 0xff, 0xff, 0xff,
    0xff, 0xff, 0xff, 0xff, 0xff, 0xf3, 0xff, 0xff, 0xff, 0xff, 0xfb, 0xff, 0xff, 0xff, 0xff, 0xff,
    0xff, 0xff, 0xff, 0xff, 0xff, 0xef, 0xff, 0xff, 0xff, 0xff, 0xfe, 0xff, 0xff, 0xff, 0xff, 0xff,
    0xff, 0xff, 0xff, 0xff, 0xff, 0xdf, 0xff, 0xfd, 0xff, 0xff, 0xff, 0xff, 0xff, 0xff, 0xff, 0xff,
    0xff, 0xff, 0xff, 0xff, 0xff, 0xbf, 0xff, 0xff, 0xf3, 0xff, 0xff, 0x7f, 0xff, 0xff, 0xff, 0xff,
    0xff, 0xff, 0xff, 0xff, 0xff, 0xbf, 0xff, 0xff, 0xef, 0xff, 0xff, 0xbf, 0xff, 0xff, 0xff, 0xff,
    0xff, 0xff, 0xff, 0xff, 0xff, 0x7f, 0xff, 0xfd, 0xdf, 0xff, 0xff, 0xbf, 0xff, 0xff, 0xff, 0xff,
    0xff, 0xff, 0xff, 0xff, 0xff, 0x7f, 0xff, 0xfd, 0xbe, 0x7d, 0xff, 0xdf, 0xff, 0xff, 0xff, 0xff,
    0xff, 0xff, 0xff, 0xff, 0xfe, 0xff, 0xff, 0xfe, 0x7b, 0xfd, 0xff, 0xdf, 0xff, 0xff, 0xff, 0xff,
    0xff, 0xff, 0xff, 0xff, 0xfb, 0xff, 0xff, 0xfe, 0x6f, 0xe7, 0xff, 0xcf, 0xff, 0xff, 0xff, 0xff,
    0xff, 0xff, 0xff, 0xfe, 0x3f, 0xff, 0xff, 0xff, 0x5e, 0xff, 0xff, 0xd7, 0xff, 0xff, 0xff, 0xff,
    0xff, 0xff, 0xff, 0xf9, 0xff, 0xff, 0xff, 0xff, 0x7b, 0xff, 0xff, 0xd7, 0xff, 0xff, 0xff, 0xff,
    0xff, 0xff, 0xff, 0xef, 0xff, 0xff, 0xff, 0xff, 0x2f, 0xff, 0xff, 0xbb, 0xff, 0xff, 0xff, 0xff,
    0xff, 0xff, 0xff, 0xdf, 0xff, 0xff, 0xff, 0xff, 0x7f, 0xff, 0xff, 0xbb, 0xff, 0xff, 0xff, 0xff,
    0xff, 0xff, 0xff, 0xbf, 0xff, 0xff, 0xff, 0xff, 0x7f, 0xff, 0xff, 0x7d, 0xff, 0xff, 0xff, 0xff,
    0xff, 0xff, 0xff, 0x7f, 0xff, 0xff, 0xff, 0xff, 0x7f, 0xff, 0xfc, 0xfd, 0xff, 0xff, 0xff, 0xff,
    0xff, 0xff, 0xff, 0x7f, 0xff, 0xff, 0xff, 0xff, 0x7f, 0xff, 0xfb, 0xff, 0xff, 0xff, 0xff, 0xff,
    0xff, 0xff, 0xfe, 0xff, 0xff, 0xff, 0xff, 0xff, 0xbf, 0xff, 0xef, 0xfe, 0xff, 0xff, 0xff, 0xff,
    0xff, 0xff, 0xfe, 0xff, 0xff, 0xfd, 0xff, 0xff, 0xdf, 0xff, 0x3f, 0xfe, 0xff, 0xff, 0xff, 0xff,
    0xff, 0xff, 0xfd, 0xff, 0xff, 0xf6, 0xff, 0xff, 0xf1, 0xe1, 0xff, 0xff, 0xff, 0xff, 0xff, 0xff,
    0xff, 0xff, 0xf7, 0xff, 0xff, 0xfb, 0xff, 0xff, 0xff, 0xb7, 0xed, 0xff, 0x7f, 0xff, 0xff, 0xff,
    0xff, 0xff, 0x9f, 0xff, 0xff, 0xfd, 0x7f, 0xff, 0xff, 0xdf, 0xdf, 0xff, 0x7f, 0xff, 0xff, 0xff,
    0xff, 0xfe, 0x7f, 0xff, 0xff, 0xfe, 0xff, 0xff, 0xff, 0xef, 0x33, 0xff, 0x7f, 0xff, 0xff, 0xff,
    0xff, 0xfb, 0xff, 0xff, 0xff, 0xff, 0xbf, 0xff, 0xff, 0xf4, 0xef, 0xff, 0xbf, 0xff, 0xff, 0xff,
    0xff, 0xf7, 0xff, 0xef, 0xff, 0xff, 0xdf, 0xff, 0xff, 0xf3, 0x9b, 0xff, 0xbf, 0xff, 0xff, 0xff,
    0xff, 0xf7, 0xff, 0xf7, 0xff, 0xff, 0xff, 0xff, 0xff, 0xf8, 0x67, 0xff, 0xdf, 0xff, 0xff, 0xff,
    0xff, 0xff, 0xff, 0xdb, 0xff, 0xff, 0xef, 0xff, 0xff, 0xfd, 0x3f, 0xff, 0xf7, 0xff, 0xff, 0xff,
    0xff, 0xff, 0xff, 0xf3, 0xff, 0xff, 0xf7, 0xff, 0xff, 0xfd, 0xdf, 0xff, 0xf9, 0xff, 0xff, 0xff,
    0xff, 0xff, 0xff, 0xfd, 0xff, 0xff, 0xf7, 0xff, 0xff, 0xfe, 0xef, 0xfc, 0xff, 0x3f, 0xff, 0xff,
    0xff, 0xff, 0xff, 0xfe, 0xff, 0xff, 0xfb, 0xff, 0xff, 0xff, 0xef, 0xf3, 0xff, 0xdf, 0xff, 0xff,
    0xff, 0xff, 0xff, 0xff, 0xff, 0xff, 0xfd, 0xff, 0xff, 0xff, 0xf7, 0xef, 0xff, 0xff, 0xff, 0xff,
    0xff, 0xf7, 0xff, 0xff, 0x7f, 0xff, 0xfd, 0xff, 0xe7, 0xff, 0xf7, 0xdf, 0xff, 0xf7, 0xff, 0xff,
    0xff, 0xf7, 0xff, 0xff, 0xbf, 0xff, 0xfe, 0xff, 0x3f, 0xff, 0xfb, 0xbf, 0xff, 0xfb, 0xff, 0xff,
    0xff, 0xf7, 0xff, 0xff, 0xdf, 0xff, 0xff, 0xfd, 0xff, 0xff, 0xfb, 0x7f, 0xff, 0xfb, 0xff, 0xff,
    0xff, 0xfb, 0xff, 0xff, 0xdf, 0xff, 0xff, 0x7b, 0xff, 0xff, 0xfe, 0xff, 0xff, 0xfb, 0xff, 0xff,
    0xff, 0xfb, 0xff, 0xff, 0xef, 0xff, 0xff, 0xbf, 0xff, 0xff, 0xfd, 0xff, 0xff, 0xfb, 0xff, 0xff,
    0xff, 0xfd, 0xff, 0xff, 0xf7, 0xff, 0xff, 0xdf, 0xff, 0xff, 0xf8, 0x79, 0xff, 0xf7, 0xff, 0xff,
    0xff, 0xfd, 0xff, 0xff, 0xff, 0xff, 0xff, 0xdf, 0xff, 0xff, 0xcf, 0xff, 0xff, 0xf7, 0xff, 0xff,
    0xff, 0xfe, 0x7f, 0xff, 0xfb, 0xff, 0xff, 0xef, 0xff, 0xff, 0x3f, 0xff, 0xff, 0xef, 0xff, 0xff,
    0xff, 0xff, 0xbf, 0xff, 0xfd, 0xff, 0xf9, 0xf7, 0xff, 0xfc, 0xff, 0xff, 0xfe, 0xef, 0xff, 0xff,
    0xff, 0xff, 0xdf, 0xff, 0xfe, 0xff, 0x9f, 0xfb, 0xff, 0xf3, 0xff, 0xff, 0xff, 0xaf, 0xff, 0xff,
    0xff, 0xff, 0xef, 0xff, 0xff, 0x7f, 0x7f, 0xfd, 0xff, 0xcf, 0xff, 0xff, 0xff, 0xcf, 0xff, 0xff,
    0xff, 0xff, 0xfb, 0xff, 0xff, 0xbe, 0xff, 0xfe, 0x7c, 0xff, 0xff, 0xfe, 0xff, 0xef, 0xff, 0xff,
    0xff, 0xff, 0xfd, 0xff, 0xff, 0xdf, 0xff, 0xff, 0x87, 0xff, 0xff, 0xff, 0x7f, 0xef, 0xff, 0xff,
    0xff, 0xff, 0xfe, 0x7f, 0xff, 0xef, 0xff, 0xff, 0x6f, 0xbf, 0xdf, 0xff, 0x7f, 0xff, 0xff, 0xff,
    0xff, 0xff, 0xff, 0xbf, 0xff, 0xf7, 0xff, 0xfe, 0xdf, 0x7f, 0xef, 0xff, 0xbf, 0xff, 0xff, 0xff,
    0xff, 0xff, 0xff, 0xdf, 0xff, 0xf9, 0xff, 0xfd, 0xde, 0xff, 0xf7, 0xff, 0xbf, 0xdf, 0xff, 0xff,
    0xff, 0xff, 0xff, 0xf7, 0xff, 0xfe, 0x1f, 0xc7, 0xfe, 0xff, 0xf7, 0xff, 0xff, 0xdf, 0xff, 0xff,
    0xff, 0xff, 0xff, 0xfd, 0xff, 0xff, 0xf8, 0x7f, 0xfd, 0xff, 0xff, 0xff, 0xdf, 0xbf, 0xff, 0xff,
    0xff, 0xff, 0xff, 0xfe, 0x7f, 0xff, 0xde, 0xff, 0xdd, 0xff, 0xff, 0xff, 0xdc, 0xff, 0xff, 0xff,
    0xff, 0xff, 0xff, 0xff, 0x9f, 0xff, 0x33, 0xff, 0xfd, 0xff, 0xf7, 0xff, 0xa7, 0xff, 0xff, 0xff,
    0xff, 0xff, 0xff, 0xff, 0xf3, 0xf8, 0x7f, 0xff, 0xed, 0xff, 0xff, 0xf9, 0xff, 0xff, 0xff, 0xff,
    0xff, 0xff, 0xff, 0xff, 0xff, 0x0f, 0xff, 0xff, 0xf8, 0xff, 0xc8, 0x3f, 0xff, 0xff, 0xff, 0xff,
    0xff, 0xff, 0xff, 0xff, 0xff, 0xff, 0xff, 0xff, 0xff, 0x00, 0xff, 0xff, 0xff, 0xff, 0xff, 0xff,
    0xff, 0xff, 0xff, 0xff, 0xff, 0xff, 0xff, 0xff, 0xff, 0xff, 0xff, 0xff, 0xff, 0xff, 0xff, 0xff,
    0xff, 0xff, 0xff, 0xff, 0xff, 0xff, 0xff, 0xff, 0xff, 0xff, 0xff, 0xff, 0xff, 0xff, 0xff, 0xff,
    0xff, 0xff, 0xff, 0xff, 0xff, 0xff, 0xff, 0xff, 0xff, 0xff, 0xff, 0xff, 0xff, 0xff, 0xff, 0xff,
    0xff, 0xff, 0xff, 0xff, 0xff, 0xff, 0xff, 0xff, 0xff, 0xff, 0xff, 0xff, 0xff, 0xff, 0xff, 0xff,
    0xff, 0xff, 0xff, 0xff, 0xff, 0xff, 0xff, 0xff, 0xff, 0xff, 0xff, 0xff, 0xff, 0xff, 0xff, 0xff
};

void setup() {
  Serial.begin(115200);

  if(!display.begin(SSD1306_SWITCHCAPVCC, 0x3C)) {
    Serial.println(F("SSD1306 allocation failed"));
    for(;;);
  }
  delay(2000); // Pause for 2 seconds

  // Clear the buffer.
  display.clearDisplay();

  // Draw bitmap on the screen
  display.drawBitmap(0, 0, image_data_Image, 128, 64, 1);
  display.display();
}

void loop() {

}
上傳程式碼後,下面就是我們在顯示器上看到的。


