You are currently viewing 使用Arduino IDE的ESP8266和BME280

使用Arduino IDE的ESP8266和BME280

本指南展示了如何將BME280感測器模組與ESP8266一起使用,以使用Arduino IDE讀取壓力、溫度、濕度和估計高度。BME280傳感器使用I2C或SPI通信協議與微控制器交換數據。

我們將向您展示如何將感測器連接到ESP8266,安裝所需的庫,並編寫一個簡單的草稿圖來顯示感測器讀數。我們還將建立一個Web Server範例,來顯示最新的壓力,溫度和濕度讀數。

在繼續本教程之前,您應該在Arduino IDE中安裝ESP8266插件。

您可能還希望閱讀其他BME280指南:

  • 使用Arduino IDE的ESP32和BME280 Sensor
  • 帶BME280的ESP32 Web服務器–氣象站
  • 使用MicroPython的ESP32 / ESP8266與BME280
  • 帶BME280的Arduino板

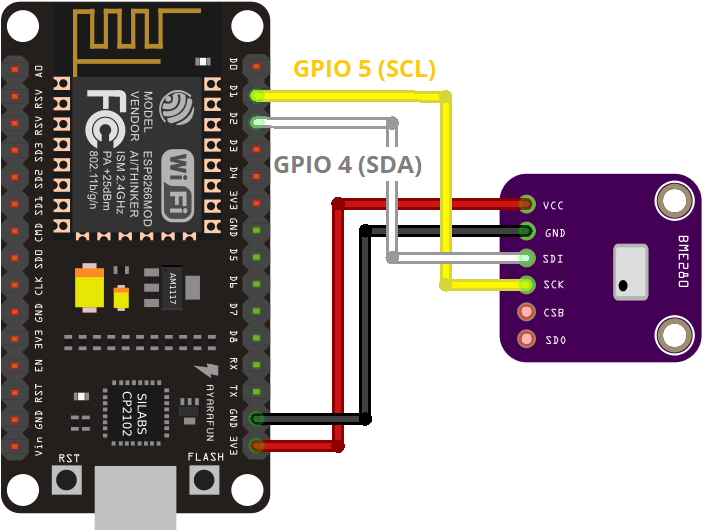
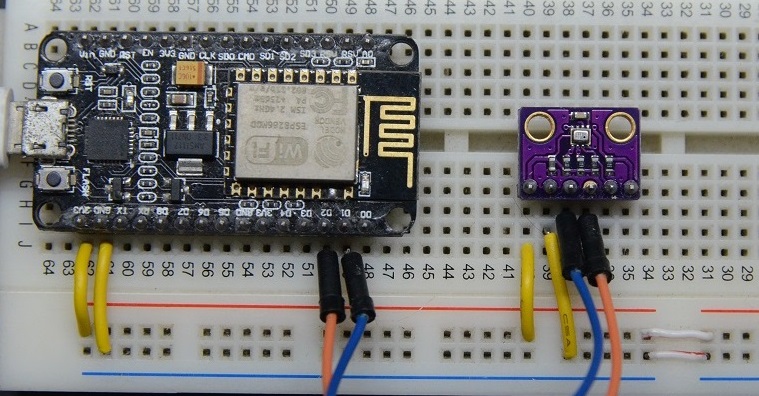
該感測器使用I2C或SPI通信協議進行通信。若使用I2C通信協議,請使用以下引腳:

BME280ESP8266
SCK(SCL引腳)GPIO 5
SDI(SDA引腳)GPIO 4

如果使用SPI通信協議,則需要使用以下引腳:

BME280ESP8266
SCK(SPI時鐘)GPIO 14
SDO(MISO)GPIO 12
SDI(MOSI)GPIO 13
CS(晶片選擇)GPIO 15

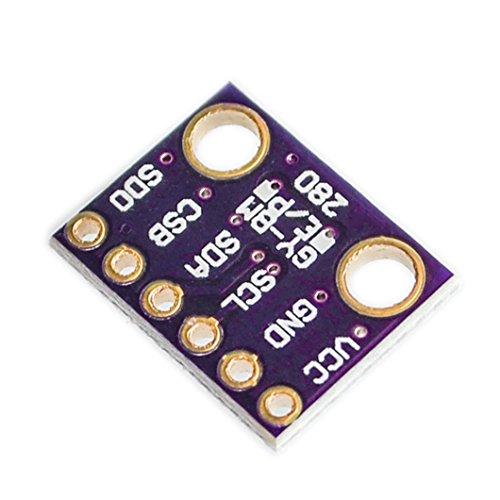
該感測器還有其他版本可以使用,如下圖示,該感測器使用I2C通信協議進行通信,接線一樣,如下表所示:

BME280ESP8266
3.3伏
地線地線
SCLGPIO 5
SDAGPIO 4

所需零件 

要完成本教程,您需要以下部分:
  • BME280傳感器模塊
  • ESP8266開發板 
  • 麵包板
  • 跳線

 原理圖–ESP8266使用I2C的BME280 

我們將與BME280感測器模組一起使用I2C通信。為此,將感測器連接到ESP8266 SDA 和 SCL 引腳,如下圖所示。

使用I2C的BME280的ESP8266原理圖

 安裝BME280庫 


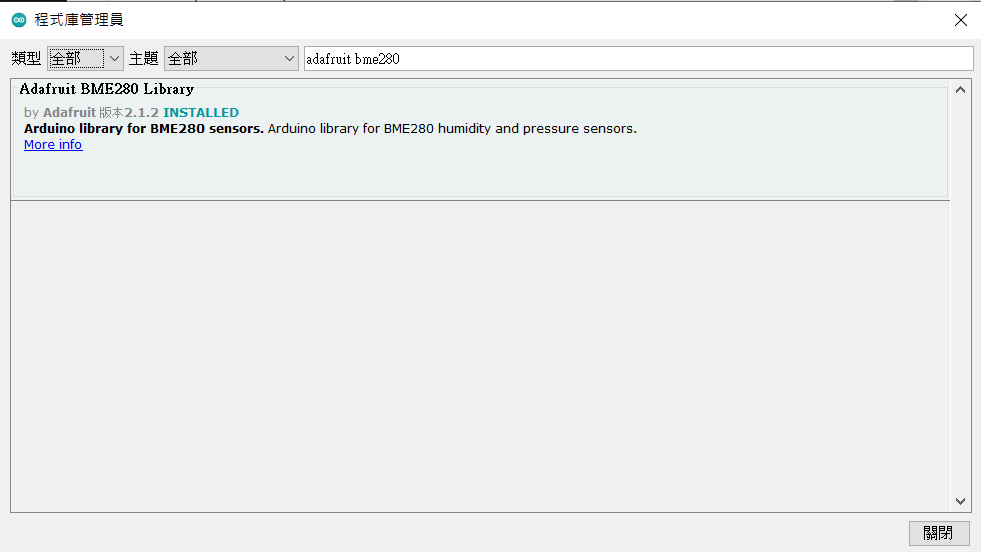
要從BME280感測器模組獲取讀數,您需要使用Adafruit_BME280庫。請按照以下步驟在您的Arduino IDE中安裝該庫:

打開您的Arduino IDE並轉到 “草稿碼”  >“ 匯入程式庫”  >“ 管理程式庫”。程式庫管理員應會開啟。

在搜索框中搜索“ adafruit bme280 ”並安裝該庫。

 安裝Adafruit_Sensor庫 

要使用BME280庫,還需要安裝Adafruit_Sensor庫。請按照以下步驟在您的Arduino IDE中安裝該程式庫:

轉到“草稿碼”  >“ 匯入程式庫”  >“ 管理程式庫”,然後在搜索框中鍵入“ Adafruit Unified Sensor ”。一直向下滾動以找到該庫並進行安裝。

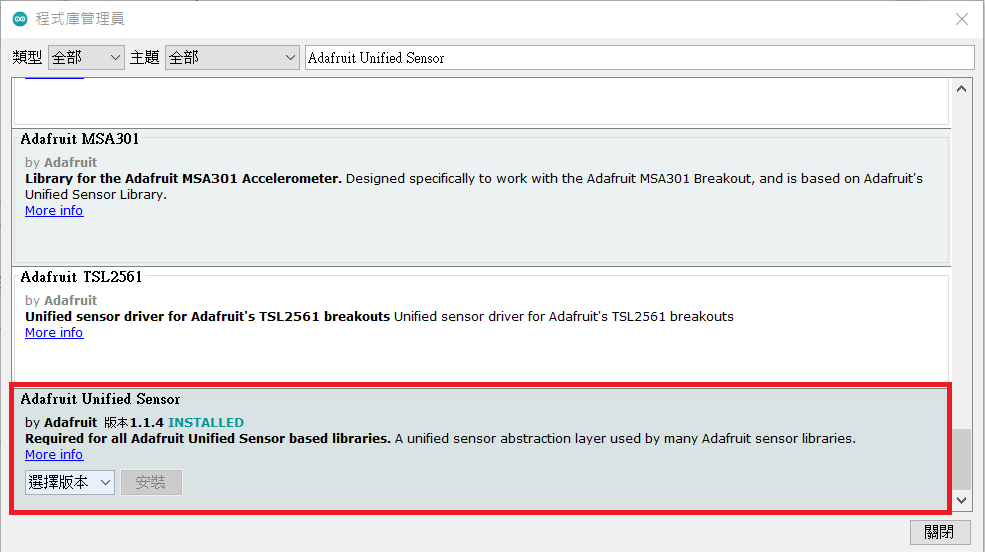
安裝庫後,重新啟動Arduino IDE。

讀取壓力、溫度和濕度 

為了讀取壓力、溫度和濕度,我們將使用程式庫中的草稿碼範例。

安裝BME280程式庫和Adafruit_Sensor庫後,打開Arduino IDE,然後轉到“檔案 >“範例” >“ Adafruit BME280庫” >“ bme280 test”

/*********************************************
  完整說明請參閱 http://honeststore.com.tw
 **********************************************/

#include <Wire.h> 
//#include <ESP8266WiFi.h> 
#include <Adafruit_BME280.h> 
#include <Adafruit_Sensor.h> 

/*#define BME_SCK 14
#define BME_MISO 12
#define BME_MOSI 13
#define BME_CS 15*/

#define SEALEVELPRESSURE_HPA (1013.25)

Adafruit_BME280 bme; // I2C
//Adafruit_BME280 bme(BME_CS); // hardware SPI
//Adafruit_BME280 bme(BME_CS, BME_MOSI, BME_MISO, BME_SCK); // software SPI

unsigned long delayTime;

void setup() {
    Serial.begin(9600);
    while(!Serial);    // time to get serial running
    Serial.println(F("BME280 test"));

    unsigned status;
    
    // default settings
    status = bme.begin(0x76);  
    // You can also pass in a Wire library object like &Wire2
    // status = bme.begin(0x76, &Wire2)
    if (!status) {
        Serial.println("Could not find a valid BME280 sensor, check wiring, address, sensor ID!");
        Serial.print("SensorID was: 0x"); Serial.println(bme.sensorID(),16);
        Serial.print("        ID of 0xFF probably means a bad address, a BMP 180 or BMP 085\n");
        Serial.print("   ID of 0x56-0x58 represents a BMP 280,\n");
        Serial.print("        ID of 0x60 represents a BME 280.\n");
        Serial.print("        ID of 0x61 represents a BME 680.\n");
        while (1) delay(10);
    }
    
    Serial.println("-- Default Test --");
    delayTime = 1000;

    Serial.println();
}


void loop() { 
    printValues();
    delay(delayTime);
}


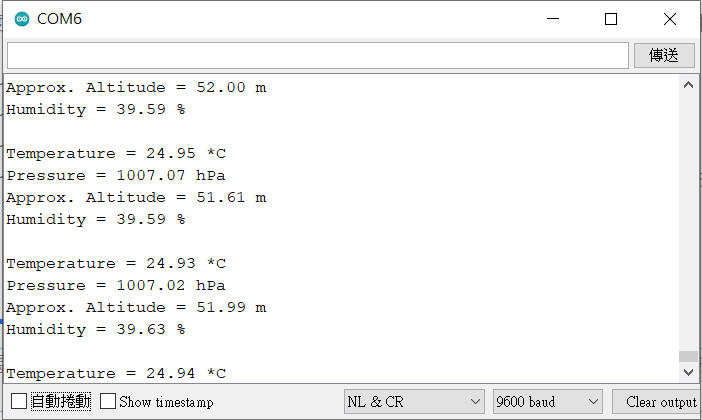
void printValues() {
    Serial.print("Temperature = ");
    Serial.print(bme.readTemperature());
    Serial.println(" *C");

    Serial.print("Pressure = ");

    Serial.print(bme.readPressure() / 100.0F);
    Serial.println(" hPa");

    Serial.print("Approx. Altitude = ");
    Serial.print(bme.readAltitude(SEALEVELPRESSURE_HPA));
    Serial.println(" m");

    Serial.print("Humidity = ");
    Serial.print(bme.readHumidity());
    Serial.println(" %");

    Serial.println();
}

我們對草稿碼進行了一些修改,使其與ESP8266完全兼容。

程式碼如何工作 

繼續閱讀本節以了解程式碼的工作原理,或跳至“展示”部分。

程式庫

該程式碼需包括所需的庫: wire程式庫以使用I2C,並且 Adafruit_Sensor 和 Adafruit_BME280 程式庫與BME280感測器接口。

#include <Wire.h> 
#include <Adafruit_BME280.h> 
#include <Adafruit_Sensor.h> 

SPI通訊

當我們要使用I2C通信時,需註解以下定義SPI引腳的行:

/*#include 
#define BME_SCK 14
#define BME_MISO 12
#define BME_MOSI 13
#define BME_CS 15*/

注意:如果您使用SPI通信,請使用ESP8266預設的SPI引腳:

MOSIMISOCLKCS
GPIO 13GPIO 12GPIO 14GPIO 15

海平面壓力

稱為 SEALEVELPRESSURE_HPA

#define SEALEVELPRESSURE_HPA (1013.25)

此變數可保存海平面百帕級別的壓力(等效於米巴里爾)。該變數用於通過將給定壓力與海平面壓力進行比較來估計海拔高度。本範例使用預設值,但要獲得更準確的結果,請將該值替換為您所在位置的當前海平面壓力。

I2C

預設情況下,此範例使用I2C通信協議。如您所見,您只需要建立一個Adafruit_BME280 對象 bme。

Adafruit_BME280 bme; // I2C

要使用SPI,您需要註釋上一行,並取消註釋以下行之一。

//Adafruit_BME280 bme(BME_CS); // hardware SPI
//Adafruit_BME280 bme(BME_CS, BME_MOSI, BME_MISO, BME_SCK); // software SPI

Setup()

在setup()裡,開始序列通訊:

Serial.begin(9600);

並初始化感測器:

// default settings
    status = bme.begin(0x76);  
    // You can also pass in a Wire library object like &Wire2
    // status = bme.begin(0x76, &Wire2)
    if (!status) {
        Serial.println("Could not find a valid BME280 sensor, check wiring, address, sensor ID!");
        Serial.print("SensorID was: 0x"); Serial.println(bme.sensorID(),16);
        Serial.print("        ID of 0xFF probably means a bad address, a BMP 180 or BMP 085\n");
        Serial.print("   ID of 0x56-0x58 represents a BMP 280,\n");
        Serial.print("        ID of 0x60 represents a BME 280.\n");
        Serial.print("        ID of 0x61 represents a BME 680.\n");
        while (1) delay(10);
    }

我們用 0x76地址。如果沒有獲得感測器讀數,請檢查傳感器的I2C地址。將BME280傳感器連接到ESP8266,運行此I2C掃描儀草稿碼以檢查感測器的地址。然後,根據需要更改地址。

Printing values

在 loop()裡, printValues() 函數從BME280讀取值並將結果印出在序列監視器中。

void loop() { 
    printValues();
    delay(delayTime);
}

讀取溫度、濕度、壓力和估計海拔高度與在儲存設備上使用以下方法一樣簡單 bme 物件:

  • bme.readTemperature() –讀取攝氏溫度;
  • bme.readHumidity() –讀取絕對濕度;
  • bme.readPressure() –讀取壓力,單位為hPa(百帕斯卡=毫巴);
  • bme.readAltitude(SEALEVELPRESSURE_HPA) –根據海平面的壓力估算海拔高度(以米為單位)。

範例 

將程式碼上傳到ESP8266,並以9600的鮑率打開Serial Monitor。按開發板的RST按鈕運行程式碼。您應該看到序列監視器上顯示的讀數。

帶BME280感測器的ESP8266 Web Server 

BME280感測器測量溫度、濕度和壓力。因此,您可以輕鬆建立一個緊湊的氣象站,並使用ESP8266內置的Web Server監控測量結果–這就是我們在本節中要做的 將以下程式碼複製到您的Arduino IDE。暫不上傳。首先,您需輸入您的SSID和密碼。
/*********
  Terry Lee
  完整說明請參閱 http://honeststore.com.tw  
*********/

// 載入Wi-Fi程式庫
#include <ESP8266WiFi.h>
#include <Wire.h>
#include <Adafruit_BME280.h>
#include <Adafruit_Sensor.h> //若使用SPI協議,再將註釋打開 /*#include #define BME_SCK 14 #define BME_MISO 12 #define BME_MOSI 13 #define BME_CS 15*/ #define SEALEVELPRESSURE_HPA (1013.25) Adafruit_BME280 bme; // I2C //Adafruit_BME280 bme(BME_CS); // hardware SPI //Adafruit_BME280 bme(BME_CS, BME_MOSI, BME_MISO, BME_SCK); // software SPI // 替代成你自己區網的SSID及密碼 const char* ssid = "REPLACE_WITH_YOUR_SSID"; const char* password = "REPLACE_WITH_YOUR_PASSWORD"; // 設置web server port為80 WiFiServer server(80); // 宣告變數儲存HTTP請求 String header; void setup() { Serial.begin(115200); bool status; // default settings // (you can also pass in a Wire library object like &Wire2) //status = bme.begin(); if (!bme.begin(0x76)) { Serial.println("Could not find a valid BME280 sensor, check wiring!"); while (1); } // 使用SSID和密碼連接到Wi-Fi網絡 Serial.print("Connecting to "); Serial.println(ssid); WiFi.begin(ssid, password); while (WiFi.status() != WL_CONNECTED) { delay(500); Serial.print("."); } // Print local IP address and start web server Serial.println(""); Serial.println("WiFi connected."); Serial.println("IP address: "); Serial.println(WiFi.localIP()); server.begin(); } void loop(){ WiFiClient client = server.available(); // Listen for incoming clients if (client) { // If a new client connects, Serial.println("New Client."); // print a message out in the serial port String currentLine = ""; // make a String to hold incoming data from the client while (client.connected()) { // loop while the client's connected if (client.available()) { // if there's bytes to read from the client, char c = client.read(); // read a byte, then Serial.write(c); // print it out the serial monitor header += c; if (c == '\n') { // if the byte is a newline character // if the current line is blank, you got two newline characters in a row. // that's the end of the client HTTP request, so send a response: if (currentLine.length() == 0) { // HTTP headers always start with a response code (e.g. HTTP/1.1 200 OK) // and a content-type so the client knows what's coming, then a blank line: client.println("HTTP/1.1 200 OK"); client.println("Content-type:text/html"); client.println("Connection: close"); client.println(); // Display the HTML web page
client.println("<!DOCTYPE html><html>");
client.println("<head><meta name=\"viewport\" content=\"width=device-width, initial-scale=1\" charset=utf-8>");
client.println("<link rel=\"icon\" href=\"data:,\">");
// CSS to style the table
client.println("<style>body { text-align: center; font-family: \"Trebuchet MS\", Arial;}");
client.println("table { border-collapse: collapse; width:80%; margin-left:auto; margin-right:auto; }");
client.println("th { padding: 12px; background-color: #0043af; color: white; }");
client.println("tr { border: 1px solid #ddd; padding: 12px; }");
client.println("tr:hover { background-color: #bcbcbc; }");
client.println("td { border: none; padding: 12px; }");
client.println(".sensor { color:white; font-weight: bold; background-color: #bcbcbc; padding: 1px; }");

// Web Page Heading
client.println("</style></head><body><h1>ESP8266 with BME280</h1>");
client.println("<table><tr><th>測量</th><th>值</th></tr>");
client.println("<tr><td>溫度. 度</td><td><span class=\"sensor\">");
client.println(bme.readTemperature());
client.println(" *C</span></td></tr>");
//client.println("<tr><td>Temp. Fahrenheit</td><td><span class=\"sensor\">");
//client.println(1.8 * bme.readTemperature() + 32);
//client.println(" *F</span></td></tr>");
client.println("<tr><td>壓力</td><td><span class=\"sensor\">");
client.println(bme.readPressure() / 100.0F);
client.println(" hPa</span></td></tr>");
client.println("<tr><td>Approx. 海拔</td><td><span class=\"sensor\">");
client.println(bme.readAltitude(SEALEVELPRESSURE_HPA));
client.println(" m</span></td></tr>");
client.println("<tr><td>溼度</td><td><span class=\"sensor\">");
client.println(bme.readHumidity());
client.println(" %</span></td></tr>");
client.println("</body></html>");

// The HTTP response ends with another blank line
client.println();
// Break out of the while loop
break;
} else { // if you got a newline, then clear currentLine
currentLine = "";
}
} else if (c != '\r') { // if you got anything else but a carriage return character,
currentLine += c; // add it to the end of the currentLine
}
}
}
// Clear the header variable
header = "";
// Close the connection
client.stop();
Serial.println("Client disconnected.");
Serial.println("");
}
}

程式碼如何工作 

繼續閱讀本節以了解程式碼的工作原理,或跳至“展示”部分。

該草稿碼與ESP8266 Web Server教程中使用的草稿碼非常相似 。首先,您將ESP8266WiFi 庫和從BME280感測器讀取的所需庫。

// 載入Wi-Fi程式庫
#include <ESP8266WiFi.h>
#include <Wire.h>
#include <Adafruit_BME280.h>
#include <Adafruit_Sensor.h>

下一行定義一個變量數,以保存海平面上的壓力。為了更準確地估計海拔高度,請用您所在位置的當前海平面壓力替換該值。

#define SEALEVELPRESSURE_HPA (1013.25)

在以下行中,您將建立一個 Adafruit_BME280 物件稱為 bme 預設情況下使用I2C與感測器建立通信。

Adafruit_BME280 bme; // I2C

如前所述,您需要在雙引號內的以下行中插入您的ssid和密碼。

const char* ssid     = "";
const char* password = "";

然後,將Web Server端口設置為80。

// 設置web server port為80
WiFiServer server(80);

下行建立一個變數來儲存HTTP的請求:

String header;

setup()

在 setup()裡,我們以115200的鮑率啟動了序列通信。

Serial.begin(115200);

檢查BME280感測器是否已成功初始化。

if (!bme.begin(0x76)) {
  Serial.println("Could not find a valid BME280 sensor, check wiring!");
  while (1);

以下幾行開始與Wi-Fi連接 WiFi.begin(ssid,密碼),等待連接成功,然後在序列監視器中印出ESP IP地址。

// 使用SSID和密碼連接到Wi-Fi網絡
  Serial.print("Connecting to ");
  Serial.println(ssid);
  WiFi.begin(ssid, password);
  while (WiFi.status() != WL_CONNECTED) {
    delay(500);
    Serial.print(".");
  }
  // Print local IP address and start web server
  Serial.println("");
  Serial.println("WiFi connected.");
  Serial.println("IP address: ");
  Serial.println(WiFi.localIP());
  server.begin();

loop()

在 loop()裡,我們對新客戶端與Web Server建立連接時發生的情況進行編程。ESP始終通過下行監聽傳入的客戶端:

WiFiClient client = server.available(); // Listen for incoming clients

收到客戶的請求後,我們將保存傳入的數據。只要客戶端保持連接,隨後的while循環將一直運行。

if (client) { // If a new client connects,
  Serial.println("New Client."); // print a message out in the serial port
  String currentLine = ""; // make a String to hold incoming data from the client
  while (client.connected()) { // loop while the client's connected
    if (client.available()) { // if there's bytes to read from the client,
      char c = client.read(); // read a byte, then
      Serial.write(c); // print it out the serial monitor
      header += c;
      if (c == '\n') { // if the byte is a newline character
        // if the current line is blank, you got two newline characters in a row.
        // that's the end of the client HTTP request, so send a response:
        if (currentLine.length() == 0) {
          // HTTP headers always start with a response code (e.g. HTTP/1.1 200 OK)
          // and a content-type so the client knows what's coming, then a blank line:
          client.println("HTTP/1.1 200 OK");
          client.println("Content-type:text/html");
          client.println("Connection: close");
          client.println();

顯示HTML網頁

您需要做的下一件事是使用HTML text向客戶端發送回應以建構網頁。

使用此表達式將網頁發送到客戶端 client.println()。您應該輸入要發送給客戶端的參數。

以下程式碼發送網頁以表格形式顯示感測器讀取數據。

client.println("<!DOCTYPE html><html>");
client.println("<head><meta name=\"viewport\" content=\"width=device-width, initial-scale=1\" charset=utf-8>");
client.println("<link rel=\"icon\" href=\"data:,\">");
// CSS to style the on/off buttons 
// Feel free to change the background-color and font-size attributes to fit your preferences
client.println("<style>body { text-align: center; font-family: \"Trebuchet MS\", Arial;}");
client.println("table { border-collapse: collapse; width:35%; margin-left:auto; margin-right:auto; }");
client.println("th { padding: 12px; background-color: #0043af; color: white; }");
client.println("tr { border: 1px solid #ddd; padding: 12px; }");
client.println("tr:hover { background-color: #bcbcbc; }");
client.println("td { border: none; padding: 12px; }");
client.println(".sensor { color:white; font-weight: bold; background-color: #bcbcbc; padding: 1px; }");
 
// Web Page Heading
client.println("</style></head><body><h1>ESP32 with BME280</h1>");
client.println("<table><tr><th>測量</th><th>值</th></tr>");
client.println("<tr><td>溫度. 度</td><td><span class=\"sensor\">");
client.println(bme.readTemperature());
client.println(" *C</span></td></tr>"); 
//client.println("<tr><td>Temp. Fahrenheit</td><td><span class=\"sensor\">");
//client.println(1.8 * bme.readTemperature() + 32);
//client.println(" *F</span></td></tr>"); 
client.println("<tr><td>壓力</td><td><span class=\"sensor\">");
client.println(bme.readPressure() / 100.0F);
client.println(" hPa</span></td></tr>");
client.println("<tr><td>Approx. 海拔</td><td><span class=\"sensor\">");
client.println(bme.readAltitude(SEALEVELPRESSURE_HPA));
client.println(" m</span></td></tr>"); 
client.println("<tr><td>溼度</td><td><span class=\"sensor\">");
client.println(bme.readHumidity());
client.println(" %</span></td></tr>"); 
client.println("</body></html>");

顯示感測器讀取數據

要在表格上顯示感測器讀數,我們只需要在相應的

和</ td>標籤之間發送即可。例如,要顯示溫度:

client.println("<tr><td>溫度. 度</td><td><span class=\"sensor\">");
client.println(bme.readTemperature());
client.println(" *C</span></td></tr>");

注意:<span>標記可用於設置text的特定部分的樣式。在這種情況下,我們使用<span>標記將感測器讀數包括在稱為“感測器”的類別中。這對於使用CSS設置text的特定部分樣式很有用。

斷開連接

最後,當回應結束時,我們清除 header 變數,並使用以下命令停止與客戶端的連接 client.stop()

// Clear the header variable
header = "";
// Close the connection
client.stop();

Web Server展示 

插入網絡憑據後,您可以將程式碼上傳到您的開發板上。

檢查是否選擇了正確的開發板和COM端口,並將程式碼上傳到ESP8266。上傳後,以115200的鮑率打開Serial Monitor,並複制ESP8266 IP地址。

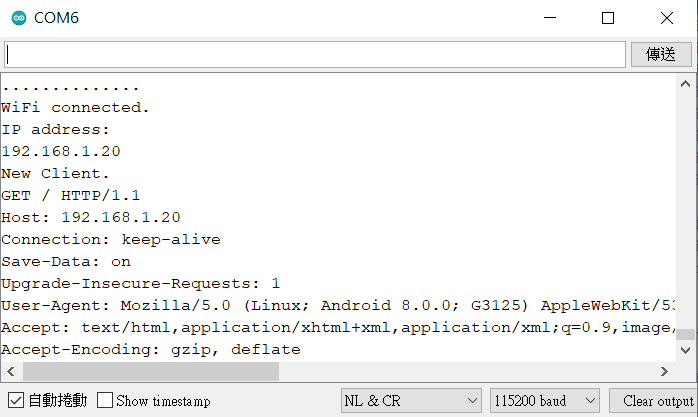
打開瀏覽器,貼上IP地址,您應該會看到最新的感測器讀數。
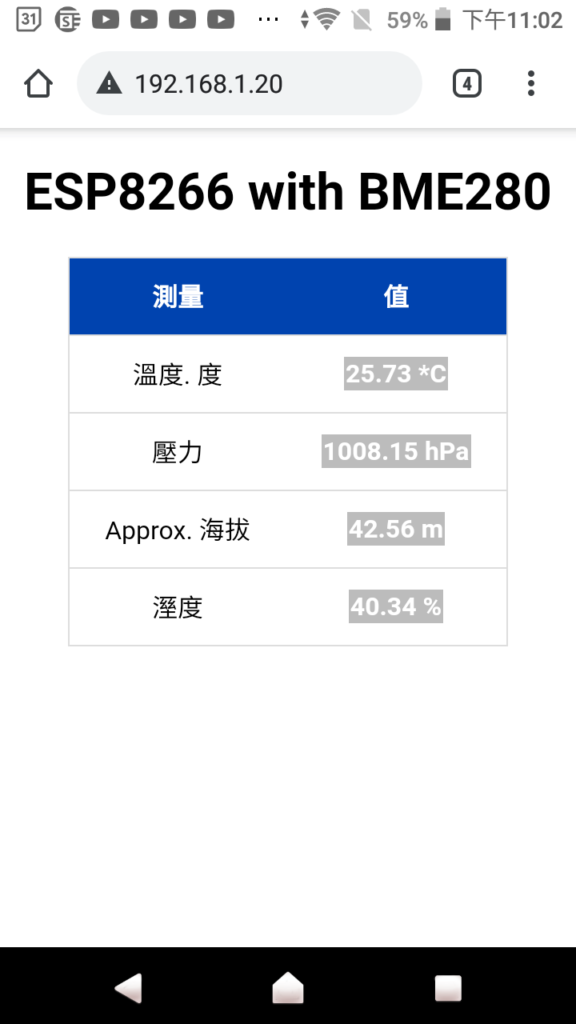
要更新讀數,您只需要刷新網頁即可。

總結 

本文是有關如何使用Arduino IDE通過ESP8266從BME280感測器獲取壓力、溫度和濕度讀數並將其顯示在Web服務器上的深入指南。

現在,您可以進一步擴展該項目,並在OLED顯示器中顯示感測器讀數。建立一個數據記錄器;將讀數保存在您自己的數據庫中,或者使用MQTT將讀數發送到您的家庭自動化平台。以下是一些項目和教程,可以幫助您實現這些想法:

  • ESP32將傳感器讀數發佈到Google表格
  • 低功耗氣象站數據記錄器(MicroPython)
  • ESP32 / ESP8266使用PHP和Arduino IDE將數據插入MySQL數據庫
  • ESP8266和帶有MQTT的Node-RED(發布和訂閱)
  • 什麼是MQTT及其工作原理

謝謝閱讀。

發佈留言