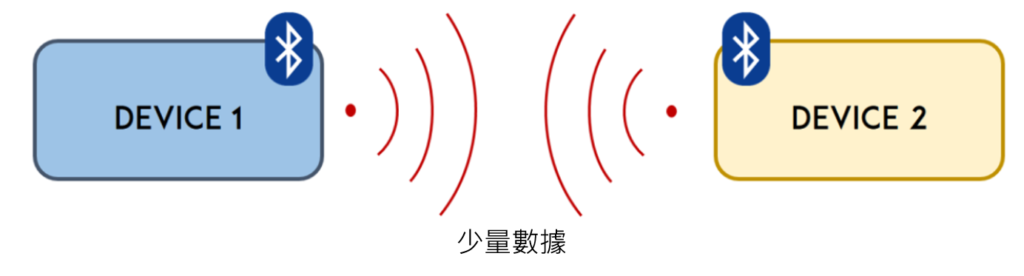
低功耗藍牙,簡稱 BLE,是藍牙的一種節能變體。BLE 的主要應用是短距離傳輸少量數據(低帶寬)。與始終開啟的藍牙不同,BLE 始終處於睡眠模式,除非啟動連接。
這樣可以使它消耗非常低的功率。BLE 的功耗比藍牙低約 100 倍。

此外,BLE 不僅支持點對點通信,還支持廣播模式和網狀網絡。
請查看下表,更詳細地比較了 BLE 和Bluetooth Classic。

由於其特性,BLE 適用於需要交換在鈕扣電池上定期運作的少量數據應用。例如,BLE 在醫療保健、健身、跟踪、beacons、安全和家庭自動化行業中非常有用。

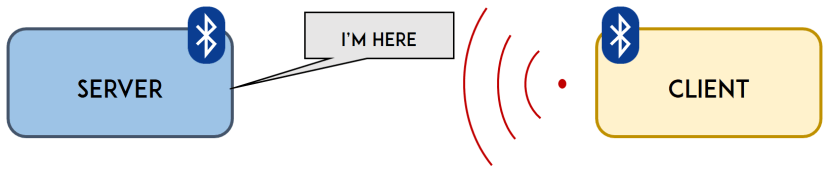
使用低功耗藍牙,有兩種類型的設備:Server(服務器端)和Client(客戶端)。ESP32 既可以作為客戶端,也可以作為服務器。
服務器通告它的存在,因此它可以被其他設備發現,並且包含客戶端可以讀取的數據。客戶端掃描附近的設備,當它找到它正在尋找的服務器時,它可以會建立一個連接並監聽傳入的數據。這稱為點對點通信。
如前所述,BLE 還支持廣播模式和網狀網絡:
- 廣播模式:服務器將數據傳輸到許多已連接的客戶端
- 網狀網絡:所有設備都已連接,這是多對多連接
儘管可以實現廣播和網狀網絡設置,但這項功能是近期開發的,目前為 ESP32 實現的範例並不多。
GATT 代表通用屬性,它定義了暴露給連接的 BLE 設備的分層數據結構。意思是 GATT 定義了兩個 BLE 設備發送和接收標準消息的方式。了解此層次結構很重要,因為這樣可以更輕鬆地了解如何使用 BLE 和編寫應用程序。

藍牙服務
層次結構的頂層是配置文件,它由一個或多個服務組成。通常,一個 BLE 設備包含多個服務。
每個服務至少包含一個特徵,或者也可以引用其他服務。服務只是信息的集合,例如感測器數據。
SIG(Bluetooth Special Interest Group)定義的幾種數據類型有預定義的服務,例如:電池電量、血壓、心率、體重秤等。您可以在此處查看其他定義的服務。

BLE特性
特徵始終歸服務所有,它是層次結構(值)中包含實際數據的地方。特徵具有兩個屬性:特徵聲明(提供有關數據的中繼資料)和特徵值。
此外,特徵值後面可以有描述,這進一步擴充了特徵聲明中包含的中繼資料。
這些屬性描述瞭如何與特徵值交換。基本上,它包含可以與特徵一起使用的操作和過程:
- Broadcast(廣播傳送)
- Read(讀)
- Write without response(無回應的寫)
- Write(寫)
- Notify(通知)
- Indicate(表明)
- Authenticated Signed Writes(經過身份驗證的簽名寫入)
- Extended Properties(擴充屬性)
UUID
每個服務、特徵和描述都有一個 UUID(通用唯一標識符號)。UUID 是唯一的 128 位(16 字節)數字。例如:
55072829-bc9e-4c53-938a-74a6d4c78776
SIG(Bluetooth Special Interest Group)中指定的所有類型、服務和配置文件都有縮短的 UUID 。
但是如果您的應用程序需要自己的 UUID,您可以使用這個UUID 產生器網站產生它。
總之,UUID 用於唯一標識信息。例如,它可以識別藍牙設備提供的特定服務。
ESP32 可以充當 BLE 服務器或 BLE 客戶端。在Arduino IDE的ESP32 BLE 庫中有幾個 ESP32 的 BLE 範例 。當您在 Arduino IDE 上安裝 ESP32 時,預設情況下會安裝此庫。
注意:您需要在 Arduino IDE 上安裝 ESP32 插件。
在您的 Arduino IDE 中,您可以轉到 檔案>範例> ESP32 BLE Arduino並選擇 BLE 庫附帶的範例。

注意:要查看 ESP32 範例,您必須在工具 > 開發板上選擇 ESP32開發板 。
為了簡要介紹 Arduino IDE 上帶有 BLE 的 ESP32,我們將建立一個 ESP32 BLE 服務器,然後建立一個 ESP32 BLE 掃描器來尋查該服務器。我們將使用並解釋 BLE 庫附帶的範例。
要遵循此範例,您需要兩個ESP32開發板。我們將使用 ESP32 DOIT DEVKIT V1 開發板。
/*
   Based on Neil Kolban example for IDF: https://github.com/nkolban/esp32-snippets/blob/master/cpp_utils/tests/BLE%20Tests/SampleScan.cpp
   Ported to Arduino ESP32 by Evandro Copercini
*/

#include <BLEDevice.h>
#include <BLEUtils.h>
#include <BLEScan.h>
#include <BLEAdvertisedDevice.h>

int scanTime = 5; //In seconds
BLEScan* pBLEScan;

class MyAdvertisedDeviceCallbacks: public BLEAdvertisedDeviceCallbacks {
    void onResult(BLEAdvertisedDevice advertisedDevice) {
      Serial.printf("Advertised Device: %s \n", advertisedDevice.toString().c_str());
    }
};

void setup() {
  Serial.begin(115200);
  Serial.println("Scanning...");

  BLEDevice::init("");
  pBLEScan = BLEDevice::getScan(); //create new scan
  pBLEScan->setAdvertisedDeviceCallbacks(new MyAdvertisedDeviceCallbacks());
  pBLEScan->setActiveScan(true); //active scan uses more power, but get results faster
  pBLEScan->setInterval(100);
  pBLEScan->setWindow(99);  // less or equal setInterval value
}

void loop() {
  // put your main code here, to run repeatedly:
  BLEScanResults foundDevices = pBLEScan->start(scanTime, false);
  Serial.print("Devices found: ");
  Serial.println(foundDevices.getCount());
  Serial.println("Scan done!");
  pBLEScan->clearResults();   // delete results fromBLEScan buffer to release memory
  delay(2000);
}
此程式碼將 ESP32 初始化為 BLE 設備並掃描附近的設備。將此程式碼上傳到您的 ESP32。您可能希望暫時將另一個ESP32與計算機斷開連接,因此請確保將程式碼上傳到正確的ESP32板上。
上傳程式碼後,您應該打開兩個 ESP32 板的電源:
- 一個帶有“BLE_server”草稿的 ESP32;
- 其他與 ESP32“BLE_scan”草稿。


It’s nearly impossible to find well-informed people for this subject, however, you sound like you know what you’re talking about! Thanks