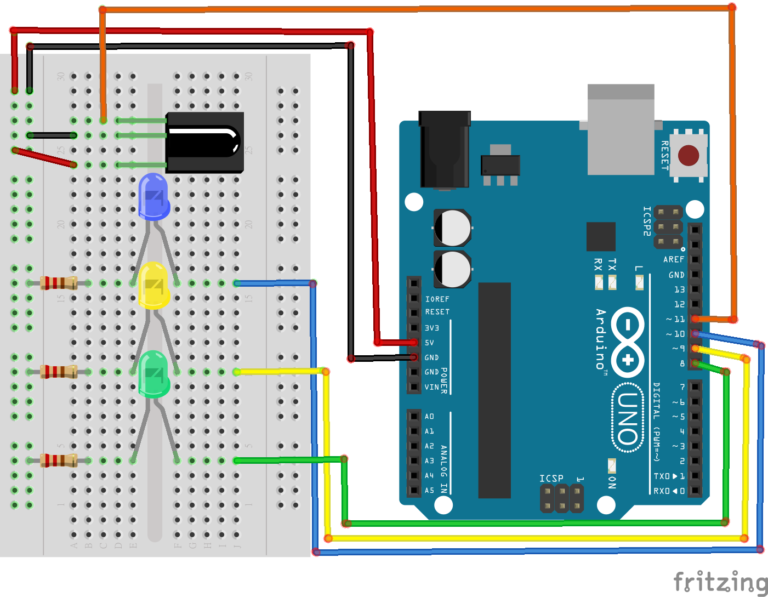
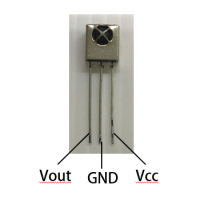
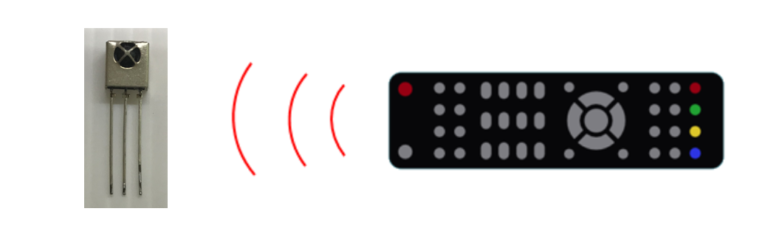
You are currently viewing Arduino –通過紅外遙控器控制LED

Arduino –通過紅外遙控器控制LED

在此項目中,您將使用紅外(IR)接收器和Arduino通過遙控器控制3個LED。這對於重新使用舊的遙控器或在功能上給遙控器的某些按鈕很有用。

該項目分為兩個部分:

  1. 解碼遙控器送出的紅外信號碼
  2. 您將使用該信號碼通過Arduino執行任務(控制3個LED)

所需零件

  • Arduino UNO 
  • 1x麵包板
  • 1個遙控器
  • 1個紅外接收器(38kHz)
  • 3個LED
  • 3個220歐姆電阻
  • 跳線

紅外線(IR)接收器介紹

紅外線接收器引腳:

  • 第一針:Vout
  • 第二針:GND
  • 第三針:Vcc

當您按遙控器時,它將發送紅外線調製信號。這些信號包含您的接收器收集的信息。

每個按鈕發送特定的信息。因此,我們可以將該信息分配給特定的按鈕。

解碼紅外線信號

在項目的此部分中,您需要解碼與每個按鈕關聯的IR信號。

原理圖

相應地將IR接收器連接到以下示意圖。

程式碼

要控制IR接收器,您需要在Arduino IDE中安裝IRremote庫 

安裝IRremote庫

  1. 點擊此處下載IRremote庫。您的下載中應該有一個.zip文件夾
  2. 解壓縮.zip文件夾,您應該得到 IRremote-master 文件夾
  3. 重命名您的文件夾 IRremote-masterIRremote
  4. 將 IRremote 文件夾移至Arduino IDE安裝庫文件夾
  5. 最後,重新打開您的Arduino IDE
將以下程式碼複製到Arduino IDE,然後將其上傳到Arduino開發板。確保選擇了正確的開發板和COM端口。
/*
 * IRremote: IRrecvDemo - demonstrates receiving IR codes with IRrecv
 * An IR detector/demodulator must be connected to the input RECV_PIN.
 * Version 0.1 July, 2009
 * Copyright 2009 Ken Shirriff
 * http://arcfn.com
 */

#include <IRremote.h>

int RECV_PIN = 11;

IRrecv irrecv(RECV_PIN);

decode_results results;

void setup()
{
  Serial.begin(9600);
  irrecv.enableIRIn(); // Start the receiver
}

void loop() {
  if (irrecv.decode(&results)) {
    Serial.println(results.value, HEX);
    irrecv.resume(); // Receive the next value
  }
  delay(100);
}

以9600的波特率打開串行序列監視器。

在此項目中,您要控制3個LED。選擇6個按鈕執行以下任務:

  1. LED1 –亮
  2. LED1 –熄滅
  3. LED2 –亮
  4. LED2 –熄滅
  5. LED3 –亮
  6. LED3 –熄滅

例如,按遙控器上的數字1。您應該在串行序列監視器上看到一個代碼。多次按相同的按鈕,以確保該按鈕具有正確的代碼。如果您看到諸如FFFFFFFF之類的東西忽略它。

對其他按鈕執行相同的操作。

寫下與每個按鈕關聯的訊息碼,因為稍後您將需要該信息。

建立最終電路

在這一部分中,您將用三個LED建立電路,這三個LED將使用遙控器進行控制。

原理圖

請按照以下示意圖組裝所有零件。

程式碼

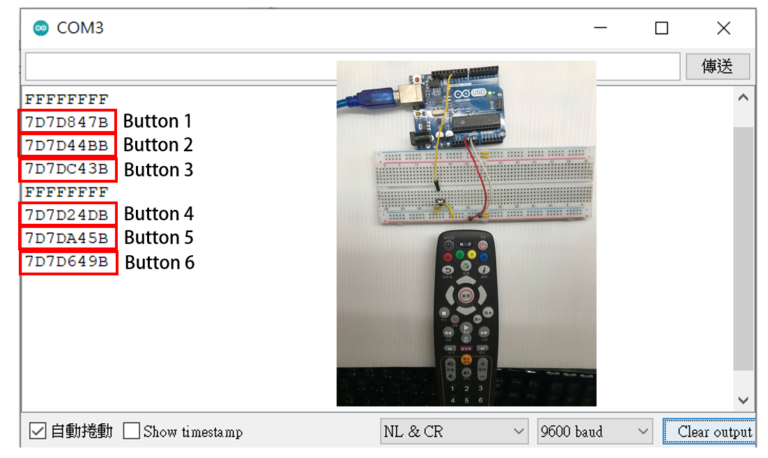
現在,獲得您在上一步中捕獲的訊息碼。您需要將訊息碼從十六進位轉換為十進位。

因此,您可以使用以下網站:  www.binaryhexconverter.com/hex-to-decimal-converter

下面是我的其中一個訊息碼的轉換示例:

對所有十六進位值重複該過程,然後儲存 十進位 值。這些是您需要在下面的程式碼中替換的程式碼。

將以下草稿碼複製到Arduino IDE。 switch行提供的草稿碼中編寫您自己的十進位值 ,並將其上載到Arduino開發板。確保選擇了正確的開發板卡和COM端口。

/*
 * Modified by Rui Santos, http://randomnerdtutorialscom
 * based on IRremote Library - Ken Shirriff
*/
 
#include <IRremote.h>
 
int IR_Recv = 11;   //IR Receiver Pin 3
int bluePin = 10;
int greenPin = 9;
int yellowPin = 8;
 
IRrecv irrecv(IR_Recv);
decode_results results;
 
void setup(){
  Serial.begin(9600);  //starts serial communication
  irrecv.enableIRIn(); // Starts the receiver
  pinMode(bluePin, OUTPUT);      // sets the digital pin as output
  pinMode(greenPin, OUTPUT);      // sets the digital pin as output
  pinMode(yellowPin, OUTPUT);      // sets the digital pin as output 

}
 
void loop(){
  //decodes the infrared input
  if (irrecv.decode(&results)){
    long int decCode = results.value;
    Serial.println(results.value);
    //switch case to use the selected remote control button
    switch (results.value){
      case 2105377915: //when you press the 1 button
        digitalWrite(bluePin, HIGH);
        break;   
      case 2105353435: //when you press the 4 button
        digitalWrite(bluePin, LOW);   
        break;
       case 2105361595: //when you press the 2 button
        digitalWrite(greenPin, HIGH);
        break;           
       case 2105386075: //when you press the 5 button
        digitalWrite(greenPin, LOW);
        break;       
       case 2105394235: //when you press the 3 button
        digitalWrite(yellowPin, HIGH);
        break;       
       case 2105369755: //when you press the 6 button
        digitalWrite(yellowPin, LOW);
        break;
    }
    irrecv.resume(); // Receives the next value from the button you press
  }
  delay(10);
}

範例

總結

這是一個學習IR接收器的好案例。您可以用它做很多事情。

例如,您可以將這些LED替換為繼電器以控製家用電器。

這一點特別有用,因為某些遙控器上有一堆您從未使用過的按鈕。那麼,為什麼不使用它們來做一些有用的事情呢?

這是我們課程的摘錄:Arduino分步項目。如果您喜歡Arduino並且想要構建更多項目,建議您參加Arduino分步項目課程

發佈留言